
Installation Instructions


39
1-877-742-3071
www.connectadock.com
1501OwnerAvenue,Atlantic,IA50022USA
Connect-A-Port Fixed Dock Attachment
Instructions for:
Connect-A-Port (CAP0001)
Connect-A-Port 2XL (CAP0002)
Fixed Dock Attachment Kit (AKF2001)
1
2
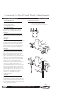
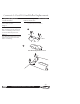
Step 1
Install roller closest to the Roller
Bracket. Secure with the washers and
cotter pins.
Tools Needed
(1) 3/4” Wrench
(2) 9/16” Wrenches
Not available in metric
Needed Items
pipe size 2” sch 40 pipe or max
dia of 2.375” (50 Dn mm sch 40)
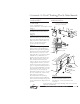
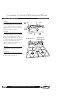
Step 2
Determine location of port installation
(front or side). Attach the two Roller
Brackets to the front or side of the
port. Use the 1/2” (13 mm) bolts and
lock washers (25ft/lbs)(3.46 kg/m).
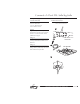
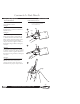
Step 4
(a)Float port up to pipe and install
front rollers. (b)Leave cotter pins and
washers off when inserting roller axle
into the roller. Next secure roller with
cotter pins and washers.
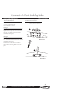
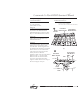
Step 3
On a fixed dock it is recommended to
get a pipe long enough to drive into
the ground, in some cases this is all
that is needed to hold the port in
place. If you have a very secure fixed
dock you can mount the pipe to the
dock but if the dock is not of the best
integrity it is not recommended
because it will work the dock loose if
you are in a high wake area. It is
recommended that you drive the pipe
in the ground and mount it to a fixed
dock if applicable. Note: pipe size 2”
sch 40 pipe or max dia of 2.375”. (50
Dn mm sch 40) Roller Bracket on
center 4’ (1.2192 m) front & 6’
(1.8288 m)side.
(a)
(b)
4