
Installation Instructions


Seaming
Place seams
• In the least conspicuous and least traveled area in the room.
• A minimum of 6" (15.4 cm) away from parallel underlayment joints.
• At least 6" (15.4 cm) away from seams in existing sheet flooring or
within the center of a row of tile.
Matching Designs
Always install sheets in the order they were cut from the roll, starting
with the first sheet.
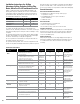
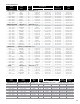
SeamingSpecications
Do Not Reverse - Seam opposite edges together.
When estimating flooring, add 3" (7.7cm) to the length of the room
dimension for the first sheet and 3" (7.7cm) plus the design match
for all other sheets.
An actual and economy design match has been listed to provide
options for producing the best appearance. The economy match does
not necessarily repeat exactly but it generally matches very well and it
is great for fill pieces and less conspicuous areas, while an actual match
may be more appropriate for a highly conspicuous area.
Seaming Procedure
All seams must be cut using the overlap and double cut method. The
straightedge and butt and recess scribe method will not produce an
acceptable seam.
Install the first sheet leaving 12" (30.8cm) unadhered along the entire
length of the seam (fully adhered floors). Position the second sheet in
the room, overlap the selvage edges and carefully match the design.
Adhere the second sheet leaving 12" (30.8cm) unadhered at the
seam for a total dry zone of 24" (61.5cm).
Place a 3" (7.7cm) wide strip of scrap flooring under the entire length
of the seam.
Cut the seam in the center of the embossed line when seaming designs
with grout lines that are wider than 5/32" (4mm).
Cut the seam up on the shoulder of the grout line in the land area when
seaming designs with narrower grout lines.
Cut the seam with a sharp utility knife and steel straightedge. Hold the
knife at a 90° angle from the floor and apply sufficient pressure to cut
through both sheets in a single pass. Use caution to avoid cutting into
the subfloor surface.
Adhering the Seam
Fully Adhered Floors
Turn the seam edges back and apply AS-01 Adhesive over the entire
dry zone. Adhesive can be applied with a 1/16" x 1/32" x 1/32"
(1.6mm x .8mm x .8mm) notched trowel over porous surfaces in a
wet set application or with a paint roller in a tacky dry application over
all approved substrates. Remember to allow the adhesive to dry to a
tack when using a paint roller. Note: Flooring should be laid into
the adhesive as quickly as possible after adhesive dries to a
tack. Use a fan to accelerate drying if working in a cool or
damp environment.
Lay the floor into the adhesive using extreme care to prevent scraping or
squeezing adhesive into the seam cut. If this should occur, lift the edges
of the sheet and clean any adhesive from the edge with a clean damp
cloth and reposition the sheets.
Roll the seam area with a 100-pound (45kg), three-section roller and
level the seam edges with a steel hand roller.
Perimeter Fasten and Loose Lay Floors
Turn one seam edge back and mark the seam location on the subfloor
with a pencil using care to avoid writing on the edge of the sheet.
Fastening the Seam with Adhesive
Use a 4" (10.2cm) wide, 1/4" (6.4mm) nap paint roller to apply a
6" (15.4cm) band of adhesive centered over the pencil line. Allow
the adhesive to set up for 15 to 30 minutes or until tacky dry. Note:
Flooring should be laid into the adhesive as quickly as possible after
adhesive dries to a tack. Use a fan to accelerate drying if working in
a cool or damp environment.
Lay the seam edges into the adhesive lightly and check to make sure the
seam is properly aligned with no gaps. Adjust if necessary. Roll the seam
with a steel hand roller to level the edges and embed the backing into the
adhesive.
Fastening the Seam with QuikStik Tape
Turn one edge of the seam back and mark the subfloor with a pencil where
the seam will fall. Position a strip of QuikStik Tape centered over the pencil
line and roll the tape with a steel hand roller. Remove the release liner and
lay the seam edges lightly in to place to achieve a net seam. If necessary
to adjust the seam, carefully lift the edge of the sheet using care to avoid
damaging the backing and re-align the seam. Once the seam is in place,
roll it with a steel hand roller.
Sealing Seams
Seal all seams before leaving the job using the recommended Seam Sealer.
Remember to pre-treat all seams in Scotchgard and SDS finishes with the
3M
®
green pad included in the SU106 kit prior to applying seam sealer.
Refer to the seam sealer label for detailed instructions. Keep traffic off
seams for a minimum of 16 hours or until fully cured.
Completing the Job
• Install trim and transition moldings. Remember to follow special
instructions for loose lay floors.
• A high quality silicone caulking must be used to seal the edge of
the flooring at net fits, in wet areas, in front of tubs, showers, sinks
and around drains.
• Return all furniture and appliances to the room. Always use strips
of hard board to protect the floor when sliding or rolling appliances
and furniture back into place.
Repair
Surface cuts and punctures are easily repaired by applying the
recommended seam sealer to the damaged spot.
More extensive damage can be repaired by replacing the damaged
area with a patch.
Obtain a matching piece of flooring material. Cut a section of the floor
slightly larger than the damaged spot. Remove complete design units
when possible.
Position the replacement piece directly over the damaged area and
accurately match the design.
Secure the replacement piece with tape on all sides.
Use a sharp utility knife and steel straightedge to cut the seams on
all sides of the repair piece.
Cut the seam in the center of a grout line or in a dark color of the floor
if possible.
Hold the utility knife at a 90° angle to the floor and cut through both
pieces in a single pass.
Remove the damaged area.
Install the repair piece using AS-01 Adhesive or QuikStik Tape to secure
the repair piece.
Seal the seams with the recommended seam sealer following label
instructions.
© 2016 Congoleum Corporation
Printed in USA M60170415S
3500 Quakerbridge Road, PO Box 3127
Mercerville, NJ 08619-0127 • www.congoleum.com
44