
Installation Instructions
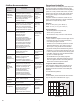

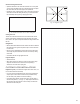

• Use the tip of a hard rubber oat and fully pack the grout into the
joints (Fig. 21). Hold the oat in a low angle and press rmly with short
strokes at a right angle to the joint.
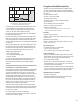
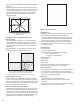
• Extend the grout a few inches in to the next row of tile so water does
not run into the unnished joints during cleanup (Fig. 22).
Remove excess grout from the surface of the tile by holding the oat at a
45° angle to the oor surface and moving diagonally across the joints.
Initial Cleanup
Initial cleanup should be done immediately after nishing each section.
The faster the grout is removed from the tile, the easier it is to clean up.
The DuraCeramic installation accessory kit contains the recommended
pads and sponge to make clean-up easier.
• Apply a light mist of water with the spray bottle over the grouted tiles
and allow it to remain on the surface for at least 30 seconds.
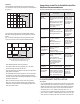
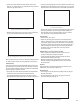
• Use a slightly wet 3M white nylon pad to loosen the grout residue.
Apply light pressure while moving the pad in a circular motion (Fig. 23).
Fig. 21 - Pack the grout into the joints.
Fig. 23 - Use a 3M white, nylon pad to
loosen grout residue.
Fig. 22 - Extend grout a few inches into the next row.
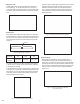
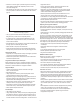
• Use a rm square edge sponge to remove the excess water solution. Use
light pressure and wipe diagonally across the joints (Fig. 24). Do not allow
the water to ow into the ungrouted joints or accumulate in nished areas.
• Then rinse the sponge in clean water and wipe diagonally again to shape
joints evenly and remove any remaining grout residue. Change rinse
water frequently. Clean tools with water while grout is wet. If allowed
to dry, remove with an ammonia-based window cleaner.
Final Cleanup
• Allow grout to dry for 24 hours.
• Remove any remaining grout haze with an ammonia-based window
cleaner or a dilute solution of 1/4 cup household ammonia to one gallon
of warm water. Apply a small amount of the solution over a small section
and allow it to remain for about 30 seconds. Use a clean sponge mop or
a 3M nylon white pad to loosen the grout haze. Rinse with fresh water
and buff with a soft, dry terry cloth towel. Do not use grout haze
removers or solvents.
IMMEDIATELY AFTER INSTALLATION
• Install or replace base moldings and return furniture to the room
by rolling or sliding them over strips of hardboard.
• Use acrylic caulking at bathtubs, showers and other wet areas to
prevent water from seeping under the oor.
• Wait 48 hours before damp mopping the oor and at least 5 days
before wet mopping or washing. Adhesive smears can be removed
with mineral spirits.
REPAIR
DuraCeramic Origins, DuraCeramic Dimensions and Ovations can be
repaired easily if it is necessary to replace a tile.
Grouted Floors
• Use a heat gun to warm the grout along one edge of the tile. The grout
will soften when heated.
• Place a straight edge over the center of the grout line and cut the
grout with a sharp utility knife (Fig. 25).
Fig. 24 - Wipe diagonally across the joint
to remove excess water.
Fig. 25 - Cut along the center of the
grout line after heating it.
63