
Installation Instructions
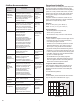

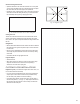

• Make a dry layout in one quadrant along the center and perpendicular
chalk lines.
• Measure the distance between the last whole tile and the wall. If the
distance in either row is less than one-forth of the diagonal dimension
of the tile, adjust the starting point and snap a new chalk line 1/4 of
the diagonal dimension of the tile away from the original chalk line
(Fig. 18). This will provide a balanced layout with larger cut tile
around the perimeter.
Herringbone Layout for Ungrouted DuraCeramic
Dimensions Only
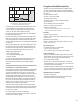
• The Herringbone layout requires only a basic square layout with a
center and perpendicular chalkline. Complete a dry layout starting
at the intersection of the chalklines to determine the size of the cut
border tile. If the border tile is less than 6" adjust the chalkline 6" in
either direction.
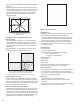
Tip: Spread adhesive in 3 quadrants (starting quadrant and adjacent
quadrants) when installing a herringbone layout (Fig. 19).
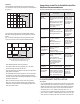
Installing Borders and Insets
• Borders can be created easily by using an accent color or different
size tile on a square layout. Plan the layout to allow for a uniform bor-
der size using full size tile in the eld if possible. When using a square
border with a diagonal layout, it is necessary to prepare the cut edge
of the diagonal tile where it meets the border.
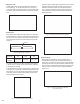
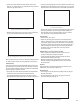
Finishing Cut Edges for Borders and Insets
• When installing tile with a diagonal layout and a square border, it will
be necessary to prepare the cut edge of the diagonally cut tile. First
cut the tile to the desired size. Then heat the cut edge and back of the
tile with a heat gun to soften it. Place the tile on a at surface and roll
the edge with a steel hand roller to turn the edge downward, forming a
slight radius (Fig. 20). Allow the tile to cool before installing it.
GROUT APPLICATION
Grouting Floors
• DuraCeramic Origins, DuraCeramic Dimensions and Ovations can be
grouted immediately or within 24 hours after setting the tiles.
• Tiles must be grouted using DuraCeramic Premix Grout. This exclu-
sive premixed acrylic grout is designed for high exural strength and
adhesion to the edge of the tile. This feature provides durability to
resist cracking from thermal dimensional changes and normal sub-
oor deection. Traditional cement grouts are not recommended and
will not perform properly.
Grout Application
Tools and Equipment
• Hard, green, rubber epoxy oat
• DuraCeramic Accessory Installation Kit DD01 containing:
• Firm, square-edge sponge
• 2 - 3M
®
white nylon scrubbing pad
• Spray bottle of water
• Water buckets
• Rubber gloves
• Safety glasses
Soft grout oats and soft sponges are not recommended because
they tend to pull the grout out of the joint, leaving it shallow.
Surface Preparation
• Re-roll the oor just before grouting and check to make sure all edges
are tightly seated in the setting adhesive. The joints must be clean
and dry. Remove any adhesive smears from the surface and edges of
the tile with mineral spirits before grouting.
Application
• Always wear rubber gloves when working with grout.
• Start grouting oors at the far end of the room and work toward
the entrance.
• Apply grout in small sections, up to 20 sq. ft. and cleanup immediately
or before grout lms over (approximately 5 minutes).
Fig. 20 - Roll the cut edge to form a slight radius.
12
Fig. 19 - Adjust the chalkline 6” in either direction
if necessary to achieve a larger border tile. After
completing dry layout spread adhesive in 3 quadrants.
Fig. 18 - Adjusting chalk lines for
a diagonal Layout.
62