
Installation Instructions


Grouted and Ungrouted Floors
• Spread the adhesive on the second half of the oor so it can dry while
you are cutting and tting the last row of tiles along the wall. Complete
the second half of the room following the same procedures.
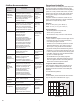
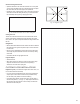
• Roll the oor slowly, in both directions, with a 100-pound, three-section
roller within one hour after setting the tiles (Fig. 16). Re-roll the entire
oor immediately before grouting or applying joint sealer.
Cutting Tile to Fit
The last row of tiles will need to be cut to t to walls and other vertical
surfaces. (Remember to subtract the grout line dimension for grouted
oors). Allow a 1/8" space for expansion between the edge of the tile and
the wall.
Straight Cuts
• Measure the distance between the last whole tile and the wall. Subtract
the dimensions for the grout and expansion space. Use this dimension
to mark the tile.
• Place a square or straightedge over the marks and score the surface
with a sharp utility knife. Break the tile over the score mark by exing
it downward.
• Install the tile with the cut edge against the wall.
Irregular Shapes
• Scribe the tile to t.
• Warm the tile with a hot air heat gun. Score the surface with a sharp
utility knife and break the tile over the score mark by exing it
downward or cut the tile with a coping saw.
CUSTOM FLOOR INSTALLATIONS
Diagonal Layouts (For DuraCeramic Origins and Ovations ONLY, not
for use with DuraCeramic Dimensions)
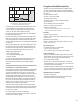
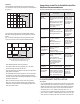
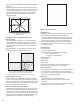
• Lay out the center and perpendicular lines as previously described for
a square layout. Place a mark on each line an equal distance away
from the center point (distance from center is arbitrary).
• Use a slightly larger arbitrary size and swing an arc on both sides of
each line from points E, F, G, H (Fig. 17). Snap diagonal chalk lines at
the point where the marks intersect. If done correctly, the chalk lines
will intersect at the center point.
11
Fig. 16 - Roll the oor within one hour after setting tiles.
Fig. 17 - Diagonal Layout.
C
H
F
D
A E G B
61