
Installation Instructions


ADHESIVE APPLICATION
WARNING: See warning statement for shock hazards
associated with tile installation near electrical outlets and
switches.
DS100 DuraSet Adhesive is recommended for all approved
wall, backsplash and base applications. The tile must be set
into the adhesive while it is in a semi tacky dry state to
achieve maximum bond strength on a vertical surface. Do
not set tile in tacky dry adhesive on walls or other vertical
surfaces.
■ Use a drop cloth to protect countertops and floors against
adhesive spills.
■ Apply DS100 adhesive on the wall, starting at the center
lines with the recommended notched trowel or a 1/4” nap
smooth surface paint roller at a coverage rate of 200 sf/gal.
When using a roller, apply a coat of adhesive thick enough
that it completely covers the surface with a light blue
color. Do not go back over adhesive once the desired coat
has been applied.
■ Allow the adhesive to tack up for 20 to 30 minutes before
setting the tile. The adhesive must be soft and sticky, not
tacky dry when setting tiles on walls. Working time is 10
to 20 minutes under normal conditions, shorter in warm,
dry conditions. Apply only enough adhesive that can be
covered within the working time. Reapply fresh adhesive
with the flat side of the trowel over adhesive that has been
allowed to dry.
SETTING WALL TILES
■ Set the first tile along the center lines and press it firmly
into place. Avoid squeezing adhesive into the joints. The
adhesive should be soft enough that the tile can be adjust-
ed slightly if needed, but will not slip when pressed firmly
into place.
■ Continue setting wall tiles in the semi tacky dry adhesive
following the details for grouted tiles using a spacer and
ungrouted tiles laid directly together.
■ Complete each adhered section including cut pieces before
adhesive dries completely to a tack.
■ Spacers can normally be removed immediately.
■ Roll each section with a wall roller using firm pressure
immediately after setting tiles.
■ Continue applying adhesive in small sections and setting
tile to complete the wall.
■ Re-roll the entire wall immediately after tiles are set and
again just prior to grouting.
■ The wall can be grouted immediately or within 24 hours.
Alternate Adhesive/Setting Method
PL Brand Polyurethane Construction Adhesive can be used as
an alternative to DS100 for setting tiles on a vertical surface.
This system provides a permanent bond and permits installa-
tion over a slightly rough or uneven surface.
• This adhesive does not have sufficient tack to prevent the
tile from slipping so it will be necessary to secure a ledger
strip to the wall before starting.
• Mark the wall at the bottom at the exact location where
the last whole tile will end. Use a level to extend a pencil
line along the entire wall at this point.
• Screw or nail a straight furring strip below the line to
temporarily rest the first row against.
• Apply the PL Polyurethane Construction Adhesive directly
onto the back of the tile. Apply a 1/8” bead of adhesive
around the perimeter, about 1/2” in from the edge and
place an “x” in the center of the tile.
• Install the tile within 10 minutes. Several pieces can be
glued at one time and then installed quickly before a
surface skin develops.
• Press each tile firmly into place with a slight back and
forth shifting motion to flatten the adhesive beads. Use
spacers to separate the tile joints on grouted applications.
Leave the spacer in place only until the adhesive sets
sufficiently to prevent tiles from slipping (2 to 4 hours).
Roll the tile with a wall roller immediately after removing
the spacers.
CUSTOM FLOOR INSTALLATIONS
Important Instructions for Using Different Spacer Sizes
When Combining DuraCeramic and DuraCeramic Options
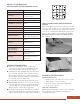
■ When installing custom installations that combine 16” x
16” formats with 8” x 8” formats, it will be necessary to
use different size spacers to maintain straight joints. Tiles
that have been scored and separated will have one addi-
tional grout line that needs to be calculated in the overall
size (Fig. 16). To compensate for the additional grout
joint, the separated tiles should be installed with a spacer
that is one-half the thickness of the spacer used for the
whole tiles (Fig. 17). The joints can be off-set on border
tiles as an alternative to using different spacer sizes
(Fig. 18).
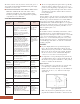
■ Consider layout and spacer size when creating a pattern
with two different tile sizes. First determine the actual size
of the pattern repeat in both directions, including the grout
line width (Fig. 19). Adjust the center lines so the pattern
is balanced in the room and the desired appearance is
achieved (Fig. 20 A/B).
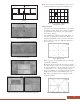
9
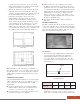
Fig. 15 – Lay out additional reference lines for
alignment and adhesive application.