
Installation Instructions


The surface must be clean, dry and free of dust, dirt, grease or
other extraneous material that will inhibit bonding. Thoroughly
vacuum floor to remove dust.
■ Deviations in the flatness of the subfloor cannot exceed
1/16” in 1’ or 3/16” in 10’. Check the surface with a
straightedge and fill low areas with a portland cement-
based latex patching compound. Gypsum-based patching
compounds are not recommended.
SUBFLOOR RECOMMENDATIONS
■ The use of a high-quality latex primer that is specifically
designed to improve adhesion may be used over wood,
porous concrete and patching compounds prior to adhesive
application. The primer will help seal the surface and tie
down dust that can interfere with the adhesive bond. Do
not use paint primers.
Concrete Floors
Concrete must be clean, dry, and free of paint, curing, harden-
ing and parting compounds, sealers, and old adhesive residue.
Moisture vapor emissions should not exceed 5 lbs./1000 ft.
2
/
24 hrs when tested with the calcium chloride kit. Do not
install DuraCeramic or DuraCeramic Options over expansion
joints; instead, cut the tile neatly to each side of the joint and
fill it with an elastomeric polyurethane joint filler or cover
with an expansion plate cover.
Wood Floors
Wood subfloors must be structurally sound and free of move-
ment with at least 18” of well-ventilated air space below.
Single layer floors and stripwood floors must be covered with
a 1/4” or heavier underlayment to achieve a total subfloor
thickness of 1”. Position underlayment joints so they offset
the joints in the tile by at least 3”. Sand underlayment joints
level and fill gaps wider than 1/32” with the recommended
patching compound.
LAYOUT
■ Layout is slightly different for grouted and ungrouted
floors. The grout line width must be added to the tile
dimension for layout on grouted floors. Additional chalk
lines are also used to keep the joints straight. Nominal
tile size is 15 5/8” x 15 5/8”. DuraCeramic Options is
7 13/16” x 7 13/16” when scored and separated.
■ It is important to avoid positioning the tile joints directly
over underlayment joints or seams in existing flooring. If
this should occur, reposition chalk lines to offset joints by
at least 3” or half of the tile dimension.
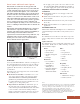
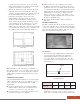
Square Layouts
• Place a mark in the center of the floor at each end of the
room. Then snap a chalk line between the marks.
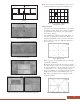
• Find the center of the line and snap a second chalk line at
a right angle; use the 3’, 4’, 5’ method to form a right
angle (Fig. 4).
• Make a dry layout in one quadrant along the center and
perpendicular chalk lines. Remember to allow the desired
5
Subfloor
Construction/ Comments Notes
Materials
Wood • Double layer construction over Subfloor must
joist or trusses on 16” centers with be solid and
at least 18” of well-ventilated free of
air space. movement.
• Install 1/4” or heavier under-
layment over strip wood, single
layer wood floors and APA-rated
Sturd-I-Floor Systems.
Underlayment • APA underlayment grade Install accord-
plywood with fully sanded face. ing to panel
• Hardwood and veneer under- manufacturers’
layment panels such as Multiply, written instruc-
HU 845 Tec-Ply and Ulay. tions.
• Lauan plywood, particleboard,
oriented strand board and chipboard
create a higher risk for installation
and adhesive failure and are not
recommended unless warranted by
the panel manufacturer or supplier.
• Not recommended over cement
backer-boards, glass mesh mortar
units or acoustical cork.
Concrete • On, above and below-grade level. Moisture vapor
• Radiant-heated floors not to emissions not
exceed 85°F (29°C). to exceed 5 lbs.
Light Weight • Minimum 100-pound density Confirm
Concrete • Installation over gypsum-based adequate
(Residential acoustical toppings is not adhesion to
Application only) recommended. substrate.
Resilient Floor • Smooth, non-cushioned sheet Must be single
(See WARNING flooring and vinyl composition tile. layer, fully
on inside cover) • Embossed non-cushioned and thin adhered and
cushioned vinyl flooring can be well bonded.
prepared with embossing leveler in Remove wax
residential applications. or polish.
• Do not install over soft, heavy
cushioned floors, self-adhering tile
or tile installed below grade level.
Ceramic and • Ceramic, marble and granite. Fill grout joints
Stone level.
Carpet/ • Not recommended. Remove
Laminate
Patching • Portland cement-based compound Refer to
Compound such as Ardex Feather Finish, manufacturers’
Mapei Plani-Patch or equal. instructions for
• Gypsum-based patching use and
compounds are not recommended. applications.
Fig. 4 - Square layout.
A
C
D
B