
Installation Instructions

Installing Borders and Insets
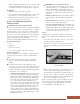
Borders can be created easily by using an accent color or
different size tile on a square layout. Plan the layout to allow
for a uniform border size using full size tile in the field if
possible.
When using a square border with a diagonal layout, it is
necessary to prepare the cut edge of the diagonal tile where
it meets the border.
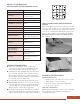
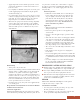
Finishing Cut Edges for Borders and Insets
When installing tile with a diagonal layout and a square
border, it will be necessary to prepare the cut edge of the
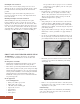
diagonally cut tile. First cut the tile to the desired size. Then
heat the cut edge and back of the tile with a heat gun to soft-
en it. Place the tile on a flat surface and roll the edge with a
steel hand roller to turn the edge downward, forming a slight
radius (Fig. 24). Allow the tile to cool before installing it.
GROUT AND JOINT SEALER APPLICATION
WARNING: See warning statement for shock hazards
associated with tile installation near electrical outlets and
switches.
Grouting Floors and Walls
• DuraCeramic and DuraCeramic Options can be grouted
immediately or within 24 hours after setting the tiles.
• Tiles must be grouted using DuraCeramic Premix Grout.
This exclusive premixed acrylic grout is designed for high
flexural strength and adhesion to the edge of the tile. This
feature provides durability to resist cracking from thermal
dimensional changes and normal subfloor deflection.
Traditional cement grouts are not recommended and will
not perform properly.
Grout Application
Tools and Equipment
• Hard, green, rubber epoxy float
• Firm, square-edge sponge
•3M
®
white nylon scrubbing pad
• Spray bottle of water
• Water buckets
• Rubber gloves
• Safety glasses
Soft grout floats and soft sponges are not recommend-
ed because they tend to pull the grout out of the joint,
leaving it shallow.
Surface Preparation
• Re-roll the floor or wall just before grouting and check
to make sure all edges are tightly seated in the setting
adhesive. The joints must be clean and dry. Remove any
adhesive smears from the surface and edges of the tile
with mineral spirits before grouting.
Application
• Start grouting floors at the far end of the room and work
toward the entrance. Walls should be grouted starting at
the bottom and working upward in narrow columns. This
will reduce the possibility of water flowing into ungrouted
joints during cleanup.
• Apply grout in small sections, up to 20 sq. ft. and cleanup
immediately or before grout films over (approximately 5
minutes).
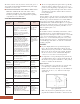
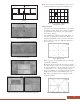
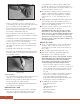
• Use the tip of a hard rubber float and fully pack the grout
into the joints (Fig. 25). Hold the float in a low angle and
press firmly with short strokes at a right angle to the joint.
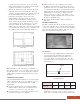
• Extend the grout a few inches in to the next row of tile
so water does not run into the unfinished joints during
cleanup (Fig. 26).
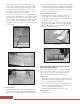
• Remove excess grout from the surface of the tile by hold-
ing the float at a 45° angle to the floor surface and moving
diagonally across the joints.
Initial Cleanup
Initial cleanup should be done immediately after finishing
each section. The faster the grout is removed from the tile,
the easier it is to clean up.
11
Fig. 24 - Roll the cut edge to
form a slight radius.
Fig. 25 - Pack the grout into the joints.
Fig. 26 - Extend grout a few inches into the next row.
1