
Installation Instructions


10
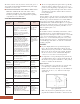
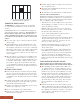
■ Use the measurement of the full pattern repeat to lay out
additional chalk lines to keep joints straight (Fig. 21).
Diagonal Layouts
• Lay out the center and perpendicular lines as previously
described for a square layout. Place a mark on each line
an equal distance away from the center point (distance
from center is arbitrary).
• Use a slightly larger arbitrary size and swing an arc on
both sides of each line from points E, F, G, H (Fig. 22).
Snap diagonal chalk lines at the point where the marks
intersect. If done correctly, the chalk lines will intersect
at the center point.
• Make a dry layout in one quadrant along the center and
perpendicular chalk lines.
• Measure the distance between the last whole tile and the
wall. If the distance in either row is less than one-forth of
the diagonal dimension of the tile (whole tile = 5 1/2” and
a separated tile = 2 3/4”), adjust the starting point and
snap a new chalk line (use the dimension for the tile being
installed) away from the original chalk line (Fig. 23).
This will provide a balanced layout with larger cut tile
around the perimeter.
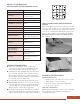
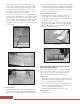
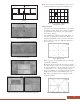
Fig. 17 - Separated border tiles use a spacer one-half
the thickness of the whole tiles.
Fig. 16 - Separated tiles will have one additional
grout line.
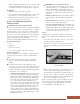
Fig. 18- An alternative to using different spacer
sizes is to off-set the joints.
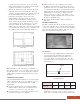
Fig. 20 - Reposition the center lines so the separated tile (A) or the whole tile
(B) is at the center of the room to achieve the desired border appearance.
Fig. 19- Determine the dimensions for the pattern repeat.
Fig. 21 - Lay out additional chalk lines the exact
dimensions of the pattern
Fig. 22 - Diagonal layout.
Fig. 23 - Adjusting chalk lines for a diagonal layout.
Use a spacer 1/2
the gauge
AB