
Installation Instructions

grout line space between the tiles. A story pole (board
marked with tile dimensions, including grout line width)
can also be used in place of a dry layout.
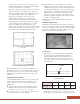
• Measure the distance between the last whole tile and the
wall. If the distance is less than half a tile, snap a new
chalk line one-half the dimension of a full tile away from
the original chalk line (Fig. 5). This will provide a
balanced layout with larger cut tile at the border.
• When installing grouted floors, divide the floor into
smaller sections to help maintain consistent grout line
widths and keep the joints running straight (Fig. 6). Each
section should be the precise dimension of 2 or 3 whole
tiles wide, including the grout line width. Lay out the
smaller sections by starting at the center lines and measuring
out toward the walls. It is not necessary to divide the room
into smaller sections when installing ungrouted floors.
Note: Chalk lines can be easily removed or difficult to see
after applying adhesive over some subfloor surfaces like old
flooring and concrete. To avoid loosing the lines, mark the
subfloor with a pencil and a straightedge, directly over the
chalk lines
ADHESIVE APPLICATION
Congoleum DS100 DuraSet Adhesive is a pressure-sensitive
adhesive that must be allowed to dry completely to a tack
before setting tiles. (See Special Instructions for Wall
Applications).
■ Apply the adhesive with the trowel blade attachment
included with the adhesive. The recommended trowel
notch size, 1/16” wide, 1/32” deep, 1/32” apart.
■ Spread the adhesive over one-half of the subfloor and a
few inches beyond the center chalk line.
■ Allow the adhesive to dry completely to a tack before
installing the tile. Normal dry to tack time is about 45 to
60 minutes; longer in cool or humid conditions. The adhe-
sive will turn from light blue to clear when tacky dry and
will not transfer to the finger when firmly touched. Do
not use fans to accelerate adhesive drying time. Fan
drying can cause the top surface of the adhesive to dry
prematurely, trapping residual moisture in and preventing
the adhesive from fully curing.
■ Tile must be installed within 12 hours after adhesive
turns clear.
SETTING FLOOR TILES
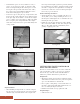
Carefully position the first tile into the adhesive at the inter-
section of the chalk lines (Fig. 7). The tile will bond instantly
on contact so it must be positioned accurately without sliding
it. Press the tile firmly into the adhesive. Follow the proce-
dures below for grouted and ungrouted floors.
Grouted Floors
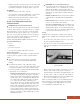
• The desired grout line width should be determined prior
to starting the flooring installation. It is important to
understand that the finished grout line will be 1/16” to
3/32” wider than the space between the tiles, since the
grout will extend up, onto the radius, along the top edge
of the tile (Fig. 8).
• Use spacers to maintain the joint width. Small pieces of
DuraCeramic or 1/8” tile, cut into 1” squares, work very
well as spacers, depending on the desired grout line width.
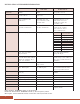
Spacer Size 1/16” 1/8” 3/16” 1/4”
Actual Grout 1/8” to 3/16” to 1/4” to 5/16” to
Line Width 5/32” 7/32” 9/32” 11/32”
6
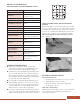
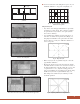
Fig. 6 - Lay out smaller sections for grouted floors.
Fig. 5 - Adjust layout at center lines for larger
border tiles.
Fig. 7 - Positioning tiles.
Fig. 8 - The finished grout line width is wider than the
space between the tiles.
C
D
BA
GROUT