
Installation Instructions

• Remove as much of the grout as possible using care to
avoid cutting into the edge of the adjacent tile. Repeat this
process on all four sides of the damaged tile.
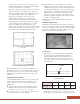
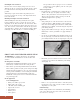
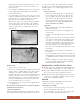
• Next, heat the tile a few inches in from the corner. While
the tile is warm, drive a putty knife or screwdriver into
the heated area with a hammer (Fig. 30).
• Then, pry upward to release the tile from the adhesive.
Continue lifting the tile as you heat it until it is completely
removed.
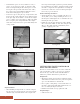
• To install the new tile, re-apply DS100 DuraSet Adhesive
over the exposed subfloor using the flat side of a trowel;
it is not necessary to remove the old adhesive.
• Allow the adhesive to dry completely to a tack and then
reinstall the new tile using spacers to maintain the grout
line width.
• Roll the tile with a 100 lb., three-section roller.
• Re-grout the tile with DuraCeramic Grout following label
instructions. Allow grout to dry for 24 hours and remove
any remaining grout haze.
Ungrouted Floors
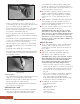
• Use a utility knife and carefully cut through the joint sealer
using care to avoid cutting into the adjacent tiles.
• Follow the same procedure for Grouted Floors to remove
the tile and re-adhere the replacement tile.
• Re-apply DuraCeramic DS200 Joint Sealer along all four
sides of the tile to seal the joints.
PREVENTIVE CARE
■ Make sure furniture legs have large surface, nonstaining
floor protectors. Replace small, narrow metal or dome-
shaped glides with smooth, flat glides that are in flat
contact with the floor. Glides should be equipped with
self-adhesive felt pads to avoid scratching the surface of
the floor. The pads should be checked periodically for grit
and wear and replaced when necessary.
■ Heavy furniture or appliances that are not moved often
should be equipped with flat, nonstaining composition
furniture casters or cups of appropriate size - available
square from 1 1/2” to 2 5/8” and round from 1 3/8” to
1 5/8”.
■ Mobile appliances and furniture should be equipped with
easily swiveling casters. They should be at least 2” in
diameter with nonstaining hard rubber treads at least 3/4”
wide. Do not use ball-shaped casters.
■ Place mats at outside entrances to prevent dirt, grit and
soil from being tracked onto the floor.
CAUTION: DuraCeramic, like other types of hard-
surfaced floors, can become slippery when wet. Allow
time for the floor to dry after washing. Immediately wipe
up wet areas from spills or wet feet. Place mats at out-
side entrances to prevent water, snow or ice from being
tracked onto the floor. Improper polishes or finishes can
also cause slipperiness.
REGULAR CARE
■ Sweep or vacuum regularly to remove grit and sand that
can abrade, dull or scratch the new floor. Do not use a
vacuum with a beater brush, because it may damage the
floor’s surface.
■ Wipe up spills promptly with a damp cloth or mop.
■ Wash the floor with Congoleum Bright ’N Easy No-
Rinse Cleaner or other suitable floor cleaner.
CAUTION: Avoid one-step “mop and polish” products,
dishwashing liquids and oil-based cleaners. These may
leave a residue which can attract dirt and dull the
floor’s finish. Avoid cleaners that contain abrasives or
solvents which may permanently damage the floor.
• Do not use acrylic or silicone sealers or penetrating
sealers on the tile surface. A copolymer or acrylic grout
sealer compatible with acrylic grouts may be used on
the grout. Do not use a penetrating silicone sealer on
the grout.
• The use of floor polish is optional. Light commercial
areas that receive a high concentration of traffic or
more frequent spills can be maintained with
Congoleum Commercial Satin-Gloss Polish (C3100)
for added protection. Do not buff the floor.
■ For additional care information contact:
Congoleum Corporation
Dept. C
3500 Quakerbridge Road
P.O. Box 3127
Mercerville, NJ 08619
1-800-274-3266
www.congoleum.com
13
Fig. 30 - Drive a putty knife into the heated area
and pry upward.
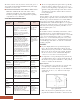
Fig. 29 - Cut along the center of the grout line
after heating it.
4/06©2006 Congoleum Corporation