
Installation Instructions

• Apply a light mist of water with the spray bottle over the
grouted tiles and allow it to remain on the surface for at
least 30 seconds.
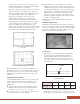
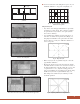
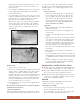
• Use a slightly wet 3M white nylon pad to loosen the grout
residue. Apply light pressure while moving the pad in a
circular motion (Fig. 27).
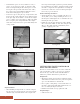
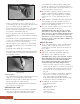
• Use a firm square edge sponge to remove the excess water
solution. Use light pressure and wipe diagonally across the
joints (Fig. 28). Do not allow the water to flow into the
ungrouted joints or accumulate in finished areas.
• Then rinse the sponge in clean water and wipe diagonally
again to shape joints evenly and remove any remaining
grout residue. Change rinse water frequently. Clean tools
with water while grout is wet. If allowed to dry, remove
with ammonia.
Final Cleanup
• Allow grout to dry for 24 hours.
• Remove any remaining grout haze with an ammonia-based
window cleaner or a dilute solution of 1/4 cup household
ammonia to one gallon of warm water. Apply a small
amount of the solution over a small section and allow it to
remain for about 30 seconds. Use a clean sponge mop or a
3M nylon white pad to loosen the grout haze. Rinse with
fresh water and buff with a soft, dry terry cloth towel. Do
not use grout haze removers or solvents.
• If touch up is necessary, new grout can be applied directly
over existing grout.
Keep all traffic off newly tiled floors for 24 hours. Resume
normal traffic after 48 hours.
Joint Sealer Application
DuraCeramic DS200 Joint Sealer is designed to keep surface
water and dirt from penetrating ungrouted floor joints. Do not
use joint sealer on walls, other vertical surfaces or apply to
the embossed center lines on DuraCeramic Options when
installing a full 16” x 16” format. Apply joint sealer to the
tile joints only.
Surface Preparation
• Roll the floor with a 100 lb., three-section roller just
before sealing the floor and check to make sure all
edges are tightly seated in the setting adhesive. The
joints must be clean and dry. Remove any adhesive
smears from the surface and edges of the tile with
mineral spirits before sealing. Vacuum the floor to
remove dust and loose particles.
Application
• Shake the applicator bottle and allow air bubbles to
dissipate before using.
• Remove the plastic cap and screw the applicator tip
onto the bottle.
• Cut 1/16” off of the applicator tip to provide a small
opening.
• Start in the far corner of the room and apply a uniform
1/16” bead of sealer in the tile joint. Apply the sealer
to the first 2 or 3 rows, then come back immediately
and seal the perpendicular (cross) joints in this area
before the sealer develops a surface film (about 4 min-
utes). Repeat this process to seal the entire floor.
• The color of the sealer will change from white to clear
when it dries.
• If the nozzle becomes clogged, use a straight pin to
free the flow.
• Protect newly applied joint sealer from foot traffic and
dust until it dries, (approximately 8 hours). Keep traffic
to a minimum and do not wash the floor for the first 48
hours.
• Use water cleanup for wet sealer and mineral spirits
for dry sealer. Caution: Mineral spirits is flammable.
Read and follow label instructions.
IMMEDIATELY AFTER INSTALLATION
■ Install or replace base moldings and return furniture to the
room by rolling or sliding them over strips of hardboard.
■ Use acrylic caulking at bathtubs, showers and other wet
areas to prevent water from seeping under the floor.
■ Wait 48 hours before damp mopping the floor and at least
5 days before wet mopping or washing. Adhesive smears
can be removed with mineral spirits.
REPAIR
DuraCeramic and DuraCeramic Options can be repaired
easily if it is necessary to replace a tile.
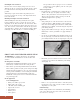
Grouted Floors and Walls
• Use a heat gun to warm the grout along one edge of the
tile. The grout will soften when heated.
• Place a straightedge over the center of the grout line and
cut the grout with a sharp utility knife (Fig. 29).
12
Fig. 27 - Use a 3M white, nylon pad to loosen grout residue.
Fig. 28 - Wipe diagonally across the joints to
remove excess water.