
Installation Instructions


• Warm the tile with a hot air heat gun. Score the surface with
a sharp utility knife and break the tile over the score mark
by flexing it downward or cut the tile with a coping saw.
Wall Outlets
• Mark the location of the outlet on the tile.
• Score the surface with a sharp utility knife over the marks.
Be careful not to extend the cut beyond the corners.
• Warm the tile with a heat gun and press firmly over the
score mark to remove the center section.
WALL, BACKSPLASH AND BASE
INSTALLATION
WARNING: Electric Shock Hazard Exists
Electrical outlets and light switches on walls and backsplash-
es must be turned off prior to spreading adhesive or grouting.
Shut off breaker(s) or remove the fuse(s) to turn off outlets
and switches in the work area. Remove the cover plate and
place tape over the entire electrical box. Do not use adhesive,
grout or water near live electrical outlets or switches. Keep
outlets and switches dry during installation.
Comply with all applicable building and electrical codes.
Special Installation Tools
• Level
• Wall roller
• Protective drop cloth
• 1/4” nap smooth surface paint roller (optional)
Surfaces Preparation
DuraCeramic Options can be installed over painted dry wall
or plaster, plywood, prepared ceramic or plastic laminate
surfaces.
■ The surface must be clean, dry and free of dust, dirt,
grease or other extraneous material that will inhibit
bonding.
■ Deviations in the flatness of the wall surface cannot
exceed 1/16” in 1’ or 3/16” in 10’. Check the surface with
a straightedge and fill low areas with a portland cement-
based latex patching compound. Gypsum-based patching
compounds are not recommended.
• Painted drywall and plaster must be smooth, dry and
clean. Bare drywall, plaster and gypsum compounds
must be primed with a high-quality latex paint primer
and allowed to dry for at least 48 hours. Existing sur-
faces must be thoroughly cleaned with a general pur-
pose cleaner and water using a 3M white pad to
remove all dirt and grease, and then rinsed thoroughly
and allowed to dry completely. Check the surface for
flatness with a straightedge and mark low areas with
a pencil. Pay particular attention to unevenness at
corners, window and door openings and joints in the
wall board. Fill low areas with a portland cement latex
patching compound. Set all protruding nails or screws
flush with the surface.
WARNING: Do not sand painted surfaces.
Some paints in the past contained lead. These paints
could be the surface coat or an underlying coat on the
walls in older dwellings. Painted surfaces that are
known to be free of lead can be lightly abraded with a
mild abrasive cleaning pad and cleaning solution if
necessary.
• Existing ceramic tile must be leveled with a portland
cement patching compound following label instruc-
tions.
• Plastic laminate surfaces should be checked to make
sure they are clean and securely bonded.
• 1/4” plywood underlayment can be installed in areas
where the wall surface is unsuitable for covering. The
underlayment should be secured with paneling adhe-
sive and screws. The screws should be sufficient length
to penetrate the wall studs by at least 3/4”.
Layout
Walls and other vertical surfaces will need to be laid out
using a level to establish the horizontal and vertical center
lines.
• Locate the center of the wall or area to be covered with
tile in the height and width directions.
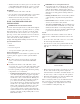
• Place the level over the center point and mark the wall
with a pencil continuing the entire length of the wall
(Fig. 14).
• Make a dry layout in a single row on the floor to check
the size of the cut tiles at the perimeter. Adjust the
horizontal and/or vertical lines one-half the distance of a
tile if necessary to achieve a larger tile at the perimeter.
• Extend the horizontal line onto adjacent walls that will
be covered so joints line up at the corners.
When covering large surfaces, lay out additional reference
lines to help keep joints running straight and establish
sections for applying only enough adhesive that can be
covered within the working time (Fig. 15).
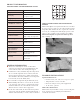
8
Fig. 14 – Use a level to establish vertical
and horizontal lines.