
Installation Instructions
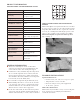
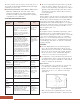
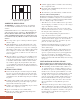


• If standard tile spacers are used, it will be necessary to
remove one leg of the spacer (Fig. 9) otherwise it will
interfere with positioning the tile. Stand spacers on end.
Do not place tile spacers flat at the intersection of tiles,
they can become bonded, making it difficult to remove
them without damaging the edge of the tile.
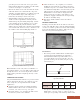
• Position two spacers along the edge of adjacent tiles, then
lay the next tile gently against the spacers without forcing
it into place (Fig. 10). Continue to set the tiles in straight
rows to complete each section (Fig. 11). Follow the chalk
lines to keep the joints straight and make minor adjust-
ments if necessary. Remove the spacers immediately after
setting each tile.
Ungrouted Floors
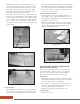
• When installing an ungrouted floor, continue setting the
tiles in a stair-step pattern along the center and perpendi-
cular lines (Fig. 12). Hold the tile in a low angle to the
floor and position it tightly against the previously laid tile.
Press it firmly into the adhesive. Continue working toward
the walls to complete the first quadrant before starting the
next. Check to make sure corners are lined up and adjust
if necessary to prevent run-out.
Grouted and Ungrouted Floors
• Spread the adhesive on the second half of the floor so it
can dry while you are cutting and fitting the last row of
tiles along the wall. Complete the second half of the room
following the same procedures.
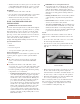
• Roll the floor slowly, in both directions, with a 100 lb.,
three-section roller within one hour after setting the tiles
(Fig. 13). Re-roll the entire floor immediately before
grouting or applying joint sealer.
CUTTING TILE TO FIT FOR FLOOR OR
WALL INSTALLATIONS
The last row of tiles will need to be cut to fit to walls and
other vertical surfaces. Allow a 1/8” space for expansion,
between the edge of the tile and the wall. Remember to
subtract the grout line dimension for grouted floors.
Straight Cuts
• Measure the distance between the last whole tile and the
wall. Subtract the dimensions for the grout and expansion
space. Use this dimension to mark the tile.
• Place a square or straightedge over the marks and score
the surface with a sharp utility knife. Break the tile over
the score mark by flexing it downward.
• Install the tile with the cut edge against the wall.
Irregular Shapes
• Scribe the tile to fit.
7
Fig. 9 - Use spacers with one leg
removed.
Fig. 10 - Position spacers before setting the tile.
Fig. 11 - Set tile in straight rows.
Fig. 13 - Roll the floor within one hour after setting tiles.
Fig. 12 - Install ungrouted floors following a
stair-step pattern.