
Installation Guide

3
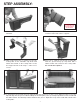
STEP ASSEMBLY:
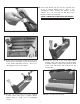
#1: Install 2 self-adhesive pads on each of the
sidewalls.
#2: Pre-drill 1/8” pilot holes in the two marked
locations at the end of the 5” support.
WARNING! Using
a corded drill near
spa may result in
electrocution.
#3: With a helper, place the 5” support over the two
locking tabs on the sidewalls. Tap down with
mallet until seated on the locking tabs. Secure
the support at both ends using 2 - #10 x 1-1/4”
screws.
#4: Place the 7” support over the two locking tabs
with the groove facing up. Tap down with a
rubber mallet until seated on the locking tabs.
No screws are required.
#5: To install the bottom tread, place the tapered edge into the groove on the 7” riser. Apply pressure to force the
tapered edge into the groove. While holding the tread in place, have your helper tap the front of the tread with
the rubber mallet. This will help seat the tread into the groove. Tap down on top of the tread until seated on the
locking tabs.