
User Manual

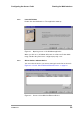
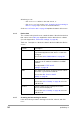
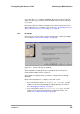
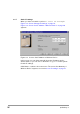
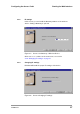

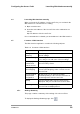
Table Of Contents
- Contents
- 1 Getting started
- 2 Installing the Access Point
- 3 Configuring the Access Point
- 3.1 Introduction
- 3.2 When to configure the Access Point
- 3.3 Starting the Web Interface
- 3.4 Launching Web Interface manually
- 3.5 Contents of Web Interface
- 3.5.1 Settings Summary
- 3.5.2 Wireless Settings
- 3.5.3 Security against unauthorized network access
- 3.5.4 To add a a client to the exception list
- 3.5.5 To delete a client from the exception list
- 3.5.6 Security against eavesdropping
- 3.5.7 Change WEP password
- 3.5.8 Security against unauthorized configuration
- 3.5.9 Identity
- 3.5.10 IP Settings
- 4 Troubleshooting
- 5 Technical specifications 11 Mbps WLAN Access Point
- 6 Regulatory notes and statements
- 6.1 Wireless LAN, Health and Authorization for use
- 6.2 Regulatory Information/disclaimers
- 6.3 USA-FCC (Federal Communications Commission) statement
- 6.4 FCC Radio Frequency Exposure statement
- 6.5 FCC Interference Statement
- 6.6 Export restrictions
- 6.7 Europe - EU R&TTE Declaration of Conformity
- 6.8 Restricted Wireless LAN device use in EU
- A TCP and IP settings
- B Wireless LAN
- Index

22
preliminary 3
Configuring the Access Point
Starting the Web Interface
IP settings can be installed automatically or manually.
3.3 Starting the Web Interface
When there is no DHCP server in your network, you can assign an IP
address to the Access Point and start up the Web Interface with the
KickStart application.
The KickStart application is needed only when:
• You start the Access Point for the first time, or
• You have reset the Access Point to factory defaults (see section
2.8.2: ‘Resetting to the default factory setting’ on page 19) and must
install the IP settings again.
The KickStart application can be found on the CD, see section
3.3: ‘Starting the Web Interface’ on page 22.
3.3.1 Installing KickStart
You can install KickStart on a PC in the network to which the Access
Point will be connected. Follow the instructions of the install wizard.
Table 3-2 Installing methods for IP settings
Install IP settings When
Automatically If the Access Point is part of a network with a
DHCP server, the DHCP server assigns the IP
settings to the Access Point for you. After that you
can configure the Access Point by starting a web
browser and inserting the IP address of the
Access Point on the address bar. This will start
the Web Interface, see section 3.4: ‘Launching
Web Interface manually’ on page 29.
Manually If there is no DHCP server, you need to install the
IP settings using the KickStart application, see
3.3: ‘Starting the Web Interface’ on page 22.