
User Manual

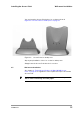

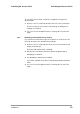

Table Of Contents
- Contents
- 1 Getting started
- 2 Installing the Access Point
- 3 Configuring the Access Point
- 3.1 Introduction
- 3.2 When to configure the Access Point
- 3.3 Starting the Web Interface
- 3.4 Launching Web Interface manually
- 3.5 Contents of Web Interface
- 3.5.1 Settings Summary
- 3.5.2 Wireless Settings
- 3.5.3 Security against unauthorized network access
- 3.5.4 To add a a client to the exception list
- 3.5.5 To delete a client from the exception list
- 3.5.6 Security against eavesdropping
- 3.5.7 Change WEP password
- 3.5.8 Security against unauthorized configuration
- 3.5.9 Identity
- 3.5.10 IP Settings
- 4 Troubleshooting
- 5 Technical specifications 11 Mbps WLAN Access Point
- 6 Regulatory notes and statements
- 6.1 Wireless LAN, Health and Authorization for use
- 6.2 Regulatory Information/disclaimers
- 6.3 USA-FCC (Federal Communications Commission) statement
- 6.4 FCC Radio Frequency Exposure statement
- 6.5 FCC Interference Statement
- 6.6 Export restrictions
- 6.7 Europe - EU R&TTE Declaration of Conformity
- 6.8 Restricted Wireless LAN device use in EU
- A TCP and IP settings
- B Wireless LAN
- Index

555004.doc
19
Installing the Access Point Unlocking the Access Point
To unlock the Access Point so that the configuration changes are
allowed again:
1. Insert one end of a paperclip briefly in the hole of the reset button.
The Access Point lock is unlocked. All settings, including the IP
settings, are retained.
2. You can now use the Web Interface to manage the Access Point
again.
2.8.2 Resetting to the default factory setting
If you press the reset button longer, more than 5 seconds, the Access
Point will be reset to the default factory settings:
1. Insert one end of a paperclip into the hole for the reset button and
keep it pressed down.
The radio LED will first burn constantly.
2. Release the reset button when the LED has stopped burning.
All settings are deleted.
3. Use KickStart to install new IP settings.
If you have a DHCP server the IP settings will probably remain the
same.
4. You can now use the Web Interface to manage the Access Point
again.