
User Manual


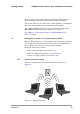
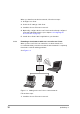
Table Of Contents
- Contents
- 1 Getting started
- 2 Installing the Access Point
- 3 Configuring the Access Point
- 3.1 Introduction
- 3.2 When to configure the Access Point
- 3.3 Starting the Web Interface
- 3.4 Launching Web Interface manually
- 3.5 Contents of Web Interface
- 3.5.1 Settings Summary
- 3.5.2 Wireless Settings
- 3.5.3 Security against unauthorized network access
- 3.5.4 To add a a client to the exception list
- 3.5.5 To delete a client from the exception list
- 3.5.6 Security against eavesdropping
- 3.5.7 Change WEP password
- 3.5.8 Security against unauthorized configuration
- 3.5.9 Identity
- 3.5.10 IP Settings
- 4 Troubleshooting
- 5 Technical specifications 11 Mbps WLAN Access Point
- 6 Regulatory notes and statements
- 6.1 Wireless LAN, Health and Authorization for use
- 6.2 Regulatory Information/disclaimers
- 6.3 USA-FCC (Federal Communications Commission) statement
- 6.4 FCC Radio Frequency Exposure statement
- 6.5 FCC Interference Statement
- 6.6 Export restrictions
- 6.7 Europe - EU R&TTE Declaration of Conformity
- 6.8 Restricted Wireless LAN device use in EU
- A TCP and IP settings
- B Wireless LAN
- Index

10
preliminary 3
Getting started
Adding Access Points to your (network) environment
When you install a new wireless network, follow these steps:
1. Configure one client.
2. Select the IP settings of this client.
3. Install the Access Point and connect it.
4. Optionally, configure the Access Point from the already configured
client using the Web Interface (see chapter 3: ‘Configuring the
Access Point’ on page 21).
5. Install other clients if this is applicable to your situation.
1.4.2 Extending a wired network with one or more Access Points
When your Access Point is an extension to a wired network, it is
recommended that you make sure that the wired network is completely
functional to exclude existing problems.
See Figure 1-3.
Follow these steps:
1. Install the Access Point and connect it.
Figure 1-3 Adding an Access Point to a wired network