
User Manual
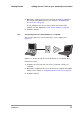

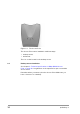
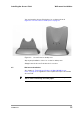
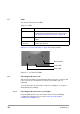

Table Of Contents
- Contents
- 1 Getting started
- 2 Installing the Access Point
- 3 Configuring the Access Point
- 3.1 Introduction
- 3.2 When to configure the Access Point
- 3.3 Starting the Web Interface
- 3.4 Launching Web Interface manually
- 3.5 Contents of Web Interface
- 3.5.1 Settings Summary
- 3.5.2 Wireless Settings
- 3.5.3 Security against unauthorized network access
- 3.5.4 To add a a client to the exception list
- 3.5.5 To delete a client from the exception list
- 3.5.6 Security against eavesdropping
- 3.5.7 Change WEP password
- 3.5.8 Security against unauthorized configuration
- 3.5.9 Identity
- 3.5.10 IP Settings
- 4 Troubleshooting
- 5 Technical specifications 11 Mbps WLAN Access Point
- 6 Regulatory notes and statements
- 6.1 Wireless LAN, Health and Authorization for use
- 6.2 Regulatory Information/disclaimers
- 6.3 USA-FCC (Federal Communications Commission) statement
- 6.4 FCC Radio Frequency Exposure statement
- 6.5 FCC Interference Statement
- 6.6 Export restrictions
- 6.7 Europe - EU R&TTE Declaration of Conformity
- 6.8 Restricted Wireless LAN device use in EU
- A TCP and IP settings
- B Wireless LAN
- Index

16
preliminary 3
Installing the Access Point
Connecting the Access Point
The wall mount socket package contains two screws and plugs to fasten
the socket to the wall (see Figure 2-3: ‘Backside of the Access
Point’ on page 16.
Step by step wall mount installation:
1. Determine the position of the screws. The screws must be 5 cm apart
to fit the keyholes at the back of the Access Point.
2. Drill holes in the wall at the location of the dots,
3. Insert the plugs into the holes.
4. Fasten the screws into the plugs, and leave about 3 mm of space
between wall and screw head.
5. Attach the Access Point to the screws.
2.6 Connecting the Access Point
Your Access Point is now ready to be connected to the electricity net and
to your network. See 1.4: ‘Adding Access Points to your (network)
environment’ on page 9 on how to add Access Points to your network or
environment.
Figure 2-3 Backside of the Access Point