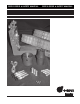
USER'S GUIDE & SAFETY MANUAL USER'S GUIDE & SAFETY MANUAL Micro Duct Installation Kit
Important Safety Notice Read and understand all procedure and safety instructions before using this product. Observe all safety information on this page and note specific safety requirements as explained by procedures called out in this manual. Failure to follow these instructions could result in serious personal injury or death. Save this user guide for future reference. Aviso Importante de Seguridad Leer y comprender todo el procedimiento y las instrucciones de seguridad antes de usar este producto.
Table of Contents 1. General Information . . . . . . . . . . . . . . . . . . . . . . . . . . . . . . . . . . 4 2. Safe Operating Practices . . . . . . . . . . . . . . . . . . . . . . . . . . . . . . 5 3. Belt Replacement . . . . . . . . . . . . . . . . . . . . . . . . . . . . . . . . . . . . 6 4. Machine Set-up . . . . . . . . . . . . . . . . . . . . . . . . . . . . . . . . . . . . . 12 5. Kits/Parts . . . . . . . . . . . . . . . . . . . . . . . . . . . . . . . . . . . . . . . . . . 16 6.
1. General Information The Micro Duct Installation Kit is designed to be used with the Condux LW Cable Blower. The Micro Duct Kit allows multiple Micro Ducts of the same size to be installed simultaneously into one larger duct, by using a combination of pushing from the tracks/belts and air to help carry the ducts. The Micro Ducts are pressurized to help reduce crushing during installation. General Machine Use a. Only qualified operators should use the machine.
Safe Operating Practices Read and understand all procedures and safety instructions before using the Micro Duct Installation Kit. Observe all safety information on this page and note specific safety requirements as explained by procedures called out in this manual. Failure to follow these instructions could result in serious personal injury, property damage or death. A. Work Area Safety 2. 1. Wear personal protective equipment: hard hat, safety glasses, safety shoes, and leather work gloves. 2.
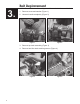
3. Belt Replacement A. Belt Removal Instructions - Upper and Lower Instructions are identical. 1. Remove screw and washer (Figure 1) 2. Unscrew handle completely (Figure 2) Figure 1 Figure 2 3. Remove top track assembly (Figure 3) 4.
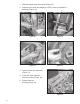
5. Rotate idler track assembly up (Figure 5) 6.
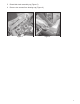
7. Loosen idler pivot shaft (Figure 7) 8. Slide track free from track idler assembly (Figure 8) Figure 7 Figure 8 9. Remove idler pivot shaft and track idler assembly (Figure 9) 10.
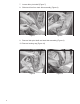
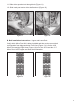
11. Slide drive sprocket out through hole (Figure 11) 12. Slide track past motor drive shaft and out (Figure 12) Figure 11 Figure 12 B. Belt Installation Instructions - Upper and Lower Belt. Verify which Micro Duct Kit is being installed and then review correct belt configuration from diagram below. Left View (Figure 13) is for the 10/8 Micro Duct and the Right view (Figure 14) is for the 12/10 and the 12.7 Micro Duct. NOTE upper and lower belt orientation.
1. Slide track past motor drive shaft (Figure 15) 2. Replace pivot screw and bushings. NOTE: correct orientation of bushings (Figure 16) Figure 15 Figure 16 Figure 17 Figure 18 3. Replace track idler assembly (Figure 17) 4. Insert two track assembly retaining screws (Figure 18) 5.
6. Tighten two idler assembly retaining screws (Figure 20) 7. Replace housing onto guide posts (Figure 21) Figure 20 Figure 21 8. Replace handle (Figure 22) 9.
4. Machine Set-up A. Install Rear Guide on the back of the blower with (2) pins provided (Figure 24) B. Install Duct Guide in Rear Guide Bracket (Figure 25) Figure 24 Figure 25 C.
D. Install Venturi in Air block on the front end of blower. Insert duct thru Venturi. (Figure 27 and 28) Figure 27 Figure 28 E. Install Duct Cap into the exposed end of Micro Duct (Figure 29) F.
G. Pressurize the Micro Duct using the Micro Duct Pressure Gauge (or similar device) to 100psi. This will help eliminate the duct from crushing during the installation process. (Figure 31 and 32) CAUTION: Do Not Over Inflate or Duct May Burst Figure 31 Figure 32 H. Rotate Venturi for best duct lay in the tracks for the number of Micro Duct being installed. (Figure 33) I. Lower top Housing and arrange Micro Duct according to the track configuration. You can now start pushing and blowing the Micro Duct.
J. Prior to installing any cable into Micro Duct it should be proofed for integrity using Air, Cable Grip and Proofing Balls.
5. Kits/Parts Part Number Description 08780710 10/08 MICRO DUCT KIT Includes The Following: 08645705 Cable Grip- .13- .
Warranty Information Condux International, Incorporated extends the following warranty to the original purchaser of these goods for use, subject to the qualifications indicated: Condux International, Incorporated warrants to the original purchaser for use that the goods or any component thereof manufactured by Condux International will be free from defects in workmanship for a period of 1 year from the date of purchase, provided such goods are installed, maintained, and used in accordance with Condux’s writ
Condux International, Inc. P.O. Box 247 • 145 Kingswood Drive, Mankato, MN 56002-0247 USA 1-507-387-6576 • 1-800-533-2077 • FAX 1-507-387-1445 Internet: www.condux.com • E-mail: cndxinfo@condux.com © Copyright 2010, Condux International, Inc. Printed in USA Literature Part Number: 08780799 Revision Number: 1.