
Manual


Calibration 13
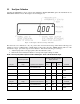
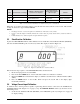
2. Press the ENTER button on the module. The display reads 0.00.
3. Set the current generator for 20 mA output. Press the
ENTER button on the module. The display should
read 100.000.
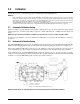
4. Turn the
DISPLAY SELECT switch (16) to the CURRENT position. Display will read 20.000.
5. Disconnect the current generator.
NOTE: If the display reading is off, set the Current Generator to 0, and press the ENTER button on the Condec
Calibration Module. Set the Current Generator for 20 mA output. The display will read 20.000. If the display reading is
off, press the ENTER button on the module. If the display reading is not 20.000, CPU is faulty and requires servicing.
3.7 Permanent Data Storage
After completing the above calibration procedures, the new data that has been entered into the computer must be
permanently stored. The sequence to do this is as follows:
1. Select the
DATA RECALL position of the rotary switch on the Condec Calibration Module (PN 60109).
2. Press the
STORE button on the module.
3. When the data is accepted, the four-digit number on the display indicates
1 020 for as long as the STORE
button is pressed.
3.8 Normal Mode Test
After completing the above calibration procedures, you must perform a normal mode test.
1. Set the Condec Calibration Module to the
NORMAL MODE position.
2.
DISPLAY SELECT switch should still be in the CURRENT position. Display will read 20.000.
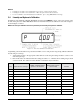
3. Turn the
DISPLAY SELECT switch to the VOLTAGE position. Display will read 100.00.
4. The pneumatic portion of the calibration is now complete and the pressure standard and the module can
now be disconnected.