
Instruction manual


69
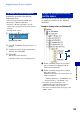
Using your computer
Using the “Picture Motion Browser” (supplied)
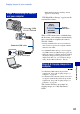
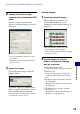
2 Connect the camera to your
computer with the dedicated USB
cable.
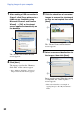
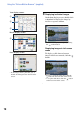
After the camera is automatically
detected, the [Import Images] screen is
displayed.
• If you use the Memory Stick slot, refer to
page 60 first.
• In Windows XP, if the Auto Play Wizard
appears, close it.
3 Import the images.
To start importing images, click the
[Import] button.
By default, images are imported into a
folder created in “My Pictures” that is
named with the date of importing.
• For instructions on changing the “Folder to
be imported”, refer to page 72.
Viewing images
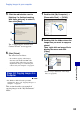
1 Checking imported images
When importing is complete, the
“Picture Motion Browser” starts.
Thumbnails of the imported images are
displayed.
• The “My Pictures” folder is set as the
default folder in “Viewed folders”.
• You can double-click a thumbnail to display
the image by itself.
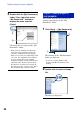
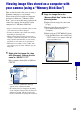
2 Viewing images in “Viewed
folders” arranged by shooting
date on a calendar
1Click the [Calendar] tab.
Years when images were shot are listed.
2Click the year.
Images shot that year are displayed,
arranged on the calendar by shooting
date.
3To display images by month, click the
desired month.
Thumbnails of images shot that month
are displayed.
4To display images by time, click the
desired date.
Thumbnails of images shot that day are
displayed, arranged by hour.