Instr. Manual M1 (Franch) 26/10/01 11:37 am TM 1.
Instr. Manual M1 (English) 26/10/01 11:38 am Page 1 CONGRATULATIONS Congratulations on the purchase of your new camera. Your camera has been carefully engineered and manufactured to give you dependable operation. Read this manual before operating the unit to become more familiar with it and obtain the performance that will bring you continued enjoyment for many years.
Instr. Manual M1 (English) 26/10/01 11:38 am Page 2 TABLE OF CONTENTS Table of Contents....................................................................................2 Important Information..............................................................................3 FCC Information ................................................................................3 User Information ................................................................................3 Precautions .........................
Instr. Manual M1 (English) 26/10/01 11:38 am Page 3 IMPORTANT INFORMATION FCC INFORMATION FCC WARNING: This equipment meets the limits for a class B digital device, pursuant to Part 15 of the FCC Rules. Only the cables supplied with the camera should be used. Operation with other cables is likely to result in interference to radio and TV reception and could void the user’s authorization to operate this equipment. This device complies with Part 15 of the FCC Rules.
Instr. Manual M1 (English) 26/10/01 11:38 am Page 4 PRECAUTIONS Be sure to observe the following precautions when using the camera: • Never try to take pictures when operating a motor vehicle or while walking. • Never try to open the case of the camera or attempt your own repairs. Always leave service to authorized repair facilities. • Keep the camera away from water and other liquids, and never let it get wet. Never use when it is raining or snowing.
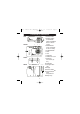
Instr. Manual M1 (English) 26/10/01 11:38 am Page 5 LOCATION OF CONTROLS TOP 4 3 2 FRONT 5 6 2X RIGHT REAR 8 10 11 DIG 1 7 I TA L Z O O M 9 12 13 14 15 5 1. Shutter Button 2. SELECT/Flash On/Off Button (Next Image/Slide Show in the TV mode) 3. MODE Button (Prev. Image/Info in the TV mode) 4. POWER Button 5. Flash 6. Lens 7. Viewfinder 8. VIDEO OUT Jack 9. USB Port Connection (To PC) 10.Viewfinder 11. Charged Flash LED 12.Display 13.EJECT Switch TM 14.CompactFlash Card Compartment 15.
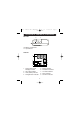
Instr. Manual M1 (English) 26/10/01 11:38 am Page 6 LOCATION OF CONTROLS (CONTINUED) BOTTOM 16 17 16. Battery Compartment 17. Tripod Mount DISPLAY 1 2 3 4 5 6 PAL NTSC 2X HIGH NORMAL 1. Pictures Taken/LCD Message Indicator 2. Auto Flash Indicator 3. Trash (Delete) Indicator 4. 2X Digital Zoom Indicator 5. 6. 7. 8. 9.
Instr. Manual M1 (English) 26/10/01 11:38 am Page 7 GETTING STARTED SOFTWARE INSTALLATION WARNING: MAKE SURE TO INSTALL THE SOFTWARE BEFORE CONNECTING THE CAMERA FOR THE FIRST TIME TO THE COMPUTER. FAILURE TO DO IT WILL PREVENT YOU FROM RETRIEVING YOUR PICTURES FROM THE CAMERA. Microsoft® Windows® Users: 1. Insert the CD into the CD-ROM Drive. 2. Open the icon My Computer by double clicking it, and then double click the CD ROM drive icon. 3. Double click the folder “PC”, then double click the PC setup.
Instr. Manual M1 (English) 26/10/01 11:38 am Page 8 GETTING STARTED (CONTINUED) install the camera driver to be able to connect your camera to your computer. You will be asked to select between the 50Hz/60Hz lighting frequency settings: • USA / Canada – 60Hz • Europe – 50Hz Creating a Desktop Icon: Double click on “My Computer” on your computer desktop. Right click on the icon “EyeQ 1300” and select “create shortcut”. Select “Yes” and this will place the “EyeQ 1300” icon on your computer desktop.
Instr. Manual M1 (English) 26/10/01 11:38 am Page 9 GETTING STARTED (CONTINUED) 5. 6. Double click the setup icon ‘Photopri.nte’ or ‘photostu.dio’. Follow the instructions presented on the screen to complete installation.
Instr. Manual M1 (English) 26/10/01 11:38 am Page 10 GETTING STARTED (CONTINUED) COMPUTER CONNECTION FOR PICTURE UPLOAD: WARNING: MAKE SURE TO INSTALL THE SOFTWARE BEFORE CONNECTING THE CAMERA FOR THE FIRST TIME TO THE COMPUTER. FAILURE TO DO THIS WILL PREVENT YOU FROM RETRIEVING YOUR PICTURES FROM THE CAMERA. The supplied USB cable allows you to upload images from the camera and/or CompactFlashTM memory card to your PC.
Instr. Manual M1 (English) 26/10/01 11:38 am Page 11 GETTING STARTED (CONTINUED) Important notes about the batteries: 1. Please do not remove batteries while the camera is still on. The camera may still be processing your picture at this time. Removing the batteries at this time will result at losing your picture and affect the normal operation of the camera. Make sure the camera is power off before removing the batteries. 2. Excessive use of flash will limit your battery life. 3.
Instr. Manual M1 (English) 26/10/01 11:38 am Page 12 GETTING STARTED LOADING THE BATTERIES Before taking pictures, insert two (2) “AA” batteries into your camera's battery compartment, as follows: 1. Open the battery compartment by pushing the tab in as in Figure 1. 2. Insert two (2) “AA” batteries into the battery compartment, observing the polarity marks (+ / -) as indicated in Figure 2. 3. Close the battery compartment until it clicks.
Instr. Manual M1 (English) 26/10/01 11:38 am Page 13 GETTING STARTED (CONTINUED) TURNING THE CAMERA ON AND OFF • To turn your camera on, press the POWER button ❶; the LCD screen will turn on and two beeps will be heard. • To turn your camera off, press the POWER button ❶ again; the LCD screen will turn blank. SPECIAL NOTE ON TURNING YOUR CAMERA OFF: While the camera is processing your pictures, pressing the power button will not shut down the camera immediately.
Instr. Manual M1 (English) 26/10/01 11:38 am Page 14 GETTING STARTED (CONTINUED) SETTING THE FLASH Your camera is equipped with two flash modes. To change the Flash mode, press the SELECT/Flash button until the Flash indicator lights or turns off as follows: Flash On (“ ” appears in the display): The auto flash is enabled. Whenever a picture is taken, and there is insufficient lighting, the flash will fire. This mode will eliminate the need of turning it on or off depending on light conditions.
Instr. Manual M1 (English) 26/10/01 11:38 am Page 15 TAKING PICTURES 1 2 1 1 To turn your camera on, press the POWER button ❶; the LCD screen will turn on and two beeps will be heard. If desired, press the SELECT/Flash button ❶ to set the flash mode of your choice (see page 14). If desired, change the Image Setting (see page 16). 3 NOTES: • If you want to store the pictures on the CompactFlashTM memory card (not included), insert the card before taking pictures.
Instr. Manual M1 (English) 26/10/01 11:38 am Page 16 OPERATION FEATURE SETTING MENUS The MODE button is used to enter the Feature Setting menu; “FEA” will appear in the display.
Instr. Manual M1 (English) 26/10/01 11:38 am Page 17 OPERATION (CONTINUED) USING THE SELF-TIMER 1 2 1 2 1 To turn your camera on, press the POWER button ❶; the LCD screen will turn on and two beeps will be heard. Press the MODE button ❶ twice to enter the Self-Timer Feature will blink in the Setting menu; display. Press the SELECT/ Flash button ❷ once; will appear. 3 4 1 2X Press the Shutter button ❶ to confirm the Self-Timer setting.
Instr. Manual M1 (English) 26/10/01 11:38 am Page 18 OPERATION (CONTINUED) TV FORMAT Select NTSC or PAL video format to correspond with your TV. To set the TV format, follow the instructions below: 1 2 1 1 Press the SELECT/Flash button ❶ to cycle between the modes to select the desired mode. When the desired mode (“PAL” or “NTSC”) appears in the display, press the Shutter button ❷ to confirm the setting.
Instr. Manual M1 (English) 26/10/01 11:38 am Page 19 OPERATION (CONTINUED) DELETING THE PICTURES FROM THE MEMORY When the camera’s internal memory and/or the inserted CompactFlashTM memory card are full, it is time to delete the pictures to free up storage space. It is recommended to transfer the pictures to your computer before deleting. 1 2 1 1 Press the MODE button ❶ four times to enter the Delete Feature Setting menu; “ ” will appear in the display.
Instr. Manual M1 (English) 26/10/01 11:38 am Page 20 TAKING A MOVIE CLIP 1 2 1 1 2 To turn your camera on, press the POWER button ❶; the LCD screen will turn on and two beeps will be heard. Press the MODE button ❶ to enter the Feature Setting menu; “FEA” and the selected Image Setting indicator will appear. Repeatedly press the SELECT/Flash button ❷ to select the “ ” icon. 3 NOTES: • When Movie setting is selected, the camera will capture movie clips in the .mov format.
Instr. Manual M1 (English) 26/10/01 11:38 am Page 21 TROUBLESHOOTING GUIDE SYMPTOM POWER Display not on. PICTURES Picture taken is poor quality. POSSIBLE CAUSE POSSIBLE SOLUTION Power is off. Batteries dead or weak. Batteries not installed correctly. Turn power on. Replace batteries. Install batteries correctly. Poor lighting. Take picture in better lighting and/or use the flash at a reasonable distance. Clean lens with a soft cloth. See Care & Maintenance section. Lens is dirty.
Instr. Manual M1 (English) 26/10/01 11:38 am Page 22 TROUBLESHOOTING GUIDE (CONTINUED) SYMPTOM Flash picture taken is too dark. Daylight picture taken is too dark. Can’t take picture. Flash did not work. Part of the picture is missing. POSSIBLE CAUSE Subject is too far away. Flash is not set to Auto. The subject is in front of bright light. Memory is full. POSSIBLE SOLUTION Move subject closer. Turn Auto Flash on. Change the subject’s position.
Instr. Manual M1 (English) 26/10/01 11:38 am Page 23 TROUBLESHOOTING GUIDE (CONTINUED) SYMPTOM User not able to load images to the PC. Batteries drain too fast during TV mode. POSSIBLE POSSIBLE CAUSE SOLUTION Camera was connected Uninstall the software to the PC BEFORE fully (Start➔Settings➔Control installing the software. Panel➔Add/Remove Programs). Scroll down the list of programs on the "Install/Uninstall" tab and select "My Digital Camera". Click on the "Add/Remove" button.
Instr. Manual M1 (English) 26/10/01 11:38 am Page 24 CARE AND MAINTENANCE CLEANING THE LENS AND VIEWFINDER Do not use cleaning solutions unless they are designed specifically for camera lenses. Do not wipe the camera lens or viewfinder with a chemically treated eyeglass lens tissue as it may scratch them. To clean: 1. Blow gently on the lens and/or viewfinder to remove dust and dirt. 2. Breathe lightly on the lens and/or viewfinder to moisten them. 3.
Technical Support Hot Line: Toll Free In the USA & Canada 1-866-522-6372 Toll Free In Europe UK: 0800-169-6482 BELGIUM: 0800-787-57 FRANCE: 0800-917-599 GERMANY: 0800-1800-563 SPAIN: 900-973-195 ITALY: 800-781-883 All Other Countries - Toll 31-53-482-9779