Table of Contents 1 Getting Started ................................................................................................................... Package Contents ............................................................................................................... System Requirements ......................................................................................................... Safety Information .....................................................................................
Taking Pictures with Self-Timer ......................................................................................... Taking Continuous Pictures ............................................................................................... Recording Video Clips ....................................................................................................... Recording Audio Clips .......................................................................................................
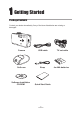
1 Getting Started Package Contents Contact your dealer immediately if any of the items listed below are missing or TV OUT USB damaged.
Getting Started System Requirements Windows: • • • • • • PC with processor better than MMX Pentium 266 MHz Windows XP/2000/ME/98SE/98 128Mbytes of RAM, at least 100Mbytes free hard disk USB port CD-ROM drive 1024 x 768 display with 24-bit color (true color) Specifications are subject to change without prior notice. Safety Information • Do not try to open the case of the camera or attempt to modify this camera in any way. High-voltage internal components create the risk of electric shock when exposed.
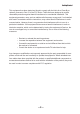
Getting Started This equipment has been tested and found to comply with the limits for a Class B peripheral, pursuant to Part 15 of the FCC Rules. These limits are designed to provide reasonable protection against harmful interference in a residential installation. This equipment generates, uses, and can radiate radio frequency energy and, if not installed and used in accordance with the instructions, may cause harmful interference to radio communication.
Getting Started Camera Components Flash Viewfinder Self-timer lamp Microphone Lens Front Self-timer/Stop/Left button Zoom in/Up button Continuous Shooting/ Pause/Right button Operation lamp Viewfinder LCD screen DISP button MENU button SET/FLASH Zoom out/Down button button Speaker Battery cover Rear Mode dial Power button Shutter button Top —4—
Getting Started Macro switch USB port Video out terminal Side Using the Included Accessories Attaching the Wrist Strap The illustration shows how to attach the wrist strap to your camera. NOTE: Don’t swing the camera when carrying it by the wrist strap. Using the Soft Case • Store the camera in the included soft case when not in use. • Slide the camera in the case with the LCD screen facing down as illustrated.
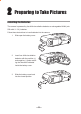
2 Preparing to Take Pictures Installing the Batteries The camera is powered by four AAA-size alkaline batteries or rechargeable Ni-MH (min. 550 mAh / 1.2 V ) batteries. Follow these instructions to insert batteries into the camera. 1 Slide open the battery cover. 2 Insert four AAA-size alkaline batteries with the positive (+) and negative (–) poles matching the directions indicated inside the battery cover. 3 Slide the battery cover back into the closed position.
Preparing to Take Pictures Low Battery Indicator The low battery indicator appears on the LCD monitor when the batteries near depletion. Change the batteries when the low battery indicator appears. NOTES: • Do not use manganese batteries. Manganese batteries cannot supply sufficient power to support camera operation. • Replace all batteries at the same time. Never mix old and new batteries. • Remove batteries from the camera if you do not plan on using it for more than two weeks.
Preparing to Take Pictures Setting the Date and Time 1 Turn the Mode Dial to any function except PLAY or PC Cam. Press the MENU button. 3 Press the Right button until the SETTINGS icon ( ) is highlighted. Press the Up or Down button to highlight the DATE & TIME item. Press the SET button to enter the DATE & TIME submenu. Press the Up and Down buttons to change the number in the highlighted position.
Preparing to Take Pictures Setting the Beep Sound The camera “beep” sound can be turned on or off in the mode menus. 1 Turn the Mode dial to any function except PLAY or PC Cam. 2 Press the MENU button. BEEP 3 Press the Right button until the SETTINGS ON icon ( ) is highlighted. OFF 4 Press the Up and Down button to highlight the BEEP item. 5 Press the SET button to enter the BEEP submenu. 6 Press the Up or Down button to set the beep ON or OFF. 7 Press SET to save the BEEP setting. 8.
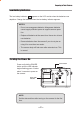
Preparing to Take Pictures TV Out Signal Set-Up The camera can be connected to a TV as described in Chapter 6, “Making Connections”. Connecting to a TV allows you to preview photos and video clips on the television screen. The TV output signal should be set to either NTSC or PAL depending on your region and the type of television you have. The default camera setting varies according to the country of purchase. NTSC: U.S.A., Canada, Taiwan, Japan, etc. PAL: Europe, Asia (excluding Taiwan), etc.
Preparing to Take Pictures Using a Memory Card Inserting an SD memory card 1 2 3 Slide open the battery cover (A). The card slot is located next to the battery compartment. Slide the SD card into the slot in the direction illustrated (B). Close the battery cover (C). A Removing an SD memory card 1 2 3 4 Slide open the battery cover (A). Gently press the SD card toward the camera and release it. The SD card ejects part way out of the slot (D). Hold the card and pull it out of the slot.
Preparing to Take Pictures Setting the Camera Mode Turn the Mode dial at the top of the camera to change the camera’s function mode. The camera has 6 modes to choose from as described below. Auto Photo Mode In auto photo mode, the camera automatically adjusts exposure and white balance to suit the shooting environment. Manual Photo Mode Manual photo mode lets you set exposure and white balance settings before taking a photo.
3 Taking Pictures Previewing a Picture Preview photos on the LCD screen before pressing the Shutter button. 1 Turn the Mode dial to Auto or Manual mode. 2 Press POWER to turn on the camera. 3 4 The LED indicator next to the viewfinder flashes green. The image automatically appears on the LCD screen together with information about current camera settings. Setting the LCD Display Mode Use the DISP Button to toggle the LCD mode.
Taking Pictures Using the Zoom Feature The digital camera is equipped with digital zoom capabilities that allow you to zoom in on a subject for a telephoto shot, or zoom out for a wide-angle shot. Press to zoom in for a telephoto shot (subject appears closer). 38 MN to zoom out for a widePress angle shot (subject appears further away). x2.6 07/24/2002 Digital zoom works by enlarging the center portion of an image through a software interpolation process.
Taking Pictures Using the Auto and Manual Photography Modes The digital camera offers two photography modes: Auto and Manual . Auto Photo Mode is the simplest to operate and is recommended for beginners. Photos in Auto mode are captured by pressing the shutter button and letting the digital camera adjust settings to match lighting conditions, focus range, and other environmental factors automatically.
Taking Pictures Taking pictures At Distant Mode 1 Turn the Mode dial to Auto or Manual 2 Press POWER to turn the camera on. 3. Slide the Macro Mode Switch to ( mode. Shutter button Power button ), located on the side of the camera. until the camera beeps. The photo is captured and stored on the cameraês internal memory, or on the SD card if inserted.
Taking Pictures Setting the Image Quality and Size How to set Image Size 1 2 3 SETTING 4 Press the Up or Down button to select the 5 IMAGE SIZE item. Press the SET button to enter the IMAGE SIZE submenu. 6 IMAGE SIZE Turn the Mode dial to Auto or Manual mode. Press MENU. Press the Right button until the SETTINGS icon ( ) is highlighted.
Taking Pictures Adjusting the Exposure Set the exposure value (EV value) manually to compensate for certain lighting conditions including: backlighting, indirect indoor lighting, and dark backgrounds. 1 Turn the Mode dial to Manual mode. 2 Press the MENU button. 3 Press the Up or Down button to change the 4 exposure value: - 2.0 ~ 2.0 Press SET to save your settings and exit the MENU. EXPOSURE 0.
Taking Pictures Setting the Flash Pressing the FLASH button cycles through the flash modes. The flash can be used in Auto and Manual photography modes, but not in Video flash mode icons appear in the LCD. Flash icon 38 MN mode. The The following list describes each flash mode. 07/24/2002 A Auto Flash: the camera detects ambient lighting conditions, and the flash fires if it detects insufficient light. Always on: the flash fires regardless of ambient lighting conditions. Off: the flash is off.
Taking Pictures Taking Pictures With Self-Timer Use the self-timer to set a delay between the time the shutter button is pressed and the time the image is captured. 1. 2. 3. 4. Turn the Mode Dial to Auto ( ) or Manual ( ) Mode. Press the Self-Timer button ( ), and the Self-Timer icon ( ) will appear on the LCD. Place the camera on a flat surface or tripod. Use the LCd to compose the picture, and then press the Shutter button to activate the Self-Timer.
Taking Pictures Recording Video Clips Video icon The digital camera can record video clips with audio. 1 Turn the Mode dial to Video 247 mode. The video icon appears in the LCD. Press the shutter button to start recording. • The recording time will display on the LCD. • The Operation Lamp will blink during video 07/24/2002 recording. Press the shutter button again to stop the recording. The camera stops recording automatically when the memory capacity has been reached.
Taking Pictures Functions Available in Each Camera Mode Function EXPOSURE Mode Auto Exposure Value: -2.0 to +2.
4 Reviewing Photos & Video and Audio Clips Viewing Pictures and Listening to Audio View photos and video clips, and listen to audio clips that are stored in the camera’s memory (internal or SD card) on the LCD screen when the camera is in Playback mode. 1 2 mode. Turn the Mode dial to Playback The last recorded image, video clip, or audio 1/2 clip appears on the LCD screen. The total number of files and the file sequence number is displayed at the bottom right corner of the LCD.
Reviewing Photos and Video Clips Viewing Pictures in Thumbnail Mode The THUMBNAIL function allows you to view up to nine images at a time on the LCD screen. 1 2 3 4 5 mode. Turn the Mode dial to Playback The last recorded photo or video clip appears on the LCD screen. Press the THUMBNAIL ( ) Button to view thumbnail images. The image that was being viewed is shown in thumbnail view. Audio file 1 2 3 4 Use the left and right buttons to select an image. Selected images are highlighted.
Reviewing Photos and Video Clips Erasing Files from Memory Erase photos, video clips, and audio clips that you don’t want to keep to make more memory available for new files. You can erase individual files or all files when the camera is in Playback mode. Deleting a Single File Delete one 1 2 3 4 Turn the Mode dial to Playback mode. Press the left and right buttons to select the file you want to delete. Press MENU to display the toolbar. Press the down button to select 5 .
Reviewing Photos and Video Clips Protecting Photos and Video Clips Individual files can be protected (locked) or unprotected (unlocked). Protect any photos or video clips that you want to keep to ensure that they are not accidentally erased. 3 4 mode. Turn the Mode dial to Playback Press the left and right buttons to select the file you want to protect. Press MENU to display the toolbar. Press the down button to select 5 PROTECT . Press SET to protect the file.
Reviewing Photos and Video Clips Using a Memory Card When you insert a flash memory card into the digital camera, new images, videos, and audio files are automatically saved to the card. A digital camera icon appears in the LCD screen. Formatting Internal or SD Card Memory To format the memory may repair the corrupted internal or SD card memory, or make the SD card valid with the camera. However, this action will erase all the files in the memory or the SD card.
5 File Names & Printing Folder Names The digital camera automatically creates a directory of folders in the internal memory or SD card that it uses to organize photos, video clips, and other information. 100C3045 Folder Example: Serial Number i. ii. iii. iv. v. Folder numbers start from 100. Each folder holds up to 999 files.
File Names & Printing File Names The camera automatically assigns a file name to each photo and video clip captured. File names start with “DSCI” and are followed by a four-digit number that increases in sequence. File Example: DSCI0001.JPG Extension File Name Serial Number i. ii. Each folder can hold up to 999 pictures. If a photo is taken when the current folder contains a file numbered 0999, the DSC creates a new folder and stores the new image in the new folder.
6 Making Connections Viewing Images on a TV Images displayed on the camera’s monitor screen can also be displayed on a television screen. TV OUT USB Video Audio 1 Use the included audio/video cable to connect the camera to the TV set as illustrated above. 2 Set the TV input signal to Video In. Refer to the documentation included with your TV for more information.
Making Connections Downloading Images to a Computer There are two ways to download files from the camera’s internal memory or SD card to a computer: • by inserting the SD card into a flash memory card reader • by connecting the camera to a computer using the included USB cable Using a Flash Memory Card Reader 1. Eject the SD card from the camera and insert it in an SD card reader that is connected to a computer.
Making Connections Connecting the Camera to a Computer with a USB Cable Note: Do not conncet the camera to the computer befor the camera driver installation is completed. Install the USB software driver included with the bundled CD-ROM. Turn the Mode Dial to any modes except the PC Cam Mode. 3 Connect the supplied USB cable to the computer’s USB port TV OUT 1 2 NOTES: • You don’t have to turn off the computer or camera when making this connection.
Making Connections 6 7 8 Open My Computer or Windows Explorer. A “Removable Disk” appears in the drive list. Double-click the “Removable Disk” icon to view its contents. Files stored on the camera are located in the folder named “DCIM”. Understanding Camera Memory and Storage Internal Memory The digital camera is equipped with internal memory. If an SD card is not installed in the camera, all photos and video clips recorded by the camera will be stored in the internal memory.
Installing Software Remarks on PC Cam Installation Under Different Windows OS The computer will automatically find your camera and install it for the first time connecting the camera to your computer, the installation message will vary on the different Windows Operating Systems. Under Windows 98/98SE: 1. The following message will pop up, indicating that the Windows system recognizes a new device and is searching for the driver. 2.
Installing Software Under Windows 2000 1. The installation message will pop up. Click “Next”. 2. The warning message of “Digital Signa ture Not Found” will pop up. Click “Yes” to continue to complete the installation. Note: The above installation may occur twice, just repeat step 1 and step 2 to complete the whole installation Under Windows ME 1. The installation message will pop up. Click “Next”. 2. The installation status bar displays.
Installing Software Under Windows XP 1. The installation message will pop up. Click “Next”. 2. The message “This driver is not digitally signed” may appear. Click “Next” to continue. 3. The “Windows Logo Testing” warning will appear; click ‘Continue Anyway’ to proceed. 4. Click “Finish” to complete the installation. Note: The above installation may occur twice, just repeat step 1 and step 4 to complete the whole installation.
Installing Software 7 Installing Software Installing the Software Driver The camera can be used as a mass storage device and can be connected to a TV to view pictures. The software driver must be installed under all operating systems to enable the camera as a mass storage device (USB) in WIN 98/98 SE and to enable the video driver for all operating systems.
Installing Software Installing MGI PhotoSuite 4 SE MGI PhotoSuite 4 SE is a photo editing application that is included for free on the software installation CD-ROM. You must use Windows XP/ME/2000/98SE/98 on your computer to use this software. Follow these steps to install the photo editing application. 1. 2. 3. Insert the software installation CD-ROM in your computer’s CD-ROM drive. The installation program starts automatically. Follow the on-screen instructions to install the software.
Installing Software 6 Select a destination folder in which the software will be installed. For most users, C:\Program Files\ is the most appropriate choice. 7 Click Next to begin copying files from the CD-ROM to the computer hard drive. 8 When installation is completed, select “Yes, I want to restart my computer now” to restart your computer.
Appendix 8 Appendix Indicator Lamp Status Mode Camera Status LED 1 Power On (until ready) Green 130 130 2 Dial Mode Change Green 130 130 General 3 Record Standby Green Busy Red Mass Storage 4 LCD Off 1 Flash Charging ('til ready) 2 Video AF Lock Green 3 Video Recording Green 4 Still AF/AE/ AWB Lock 130 130 Green Red w/ Flash Red w/o Flash Green 130 130 500 500 5 Capture Still Image Green 130 130 6 Saving Image Green 130 130 7 Self-timer Capture (10 sec./2 sec.
Troubleshooting Troubleshooting Problem Power does not turn on. The camera does not take pictures.
Getting help GETTING HELP You can get help from our troubleshooting section, FAQ on our website or by contacting a customer support representative. Troubleshooting Section If you need help with your camera, refer to the Troubleshooting section of this manual on page 41. Website Customer Support/FAQ Please visit our customer support website at www.concord-camera.com to view the Frequently Asked Questions (FAQ) by clicking the appropriate camera model picture in the çCamera Support ç Section.
Specifications Specifications Sensor Lens Built-In Viewfinder Focus Range LCD Display Still Image Resolution Video Resolution Still Image Quality Exposure Control Exposure Compensation Shutter Control Digital Zoom Image File Format White Balance Picture Storage Microphone Sound Feedback Communication Interface Self-Timer Playback Mode TV System Power Supply Dimensions Weight 3.1 megapixel CMOS F 2.8 ~ 8.47 Field of View: 85% Normal: 1 M (3.25 ft.) ~ infinity Macro: (W) 20 cm (7.9") 1.
SAFETY TIPS AND MAINTENANCE SAFETY TIPS AND MAINTENANCE Cleaning the camera body: 1. Please use a soft dry cloth to clean the camera. Cleaning the lens, viewfinder and LCD: 1. Blow off dirt or dust with a blower or canned air. 2. Gently wipe the lens, viewfinder and/or LCD with a micro-fiber cloth. 3. To remove dirt or residue, moisten the cloth with lens cleaning fluid and gently wipe the lens, viewfinder and/or LCD. CAUTION: Do not apply the fluid directly onto the lens, viewfinder or LCD.
SAFETY TIPS AND MAINTENANCE • Allowing dust to accumulate in the camera over a long period of time is hazardous and in extreme circumstances may cause a fire. It is best to clean your camera prior to seasonal periods of high humidity. Precautions for batteries: • Dispose of the batteries in a manner that complies with applicable laws. • Leakage, overheating, or burst batteries could result in fire or injury. • Do not short circuit, heat or dispose of batteries in fire.
REGULATOR INFORMATION REGULATOR INFORMATION FCC INFORMATION FCC WARNING: This equipment meets the limits for a Class B digital device, pursuant to Part 15 of FCC rules. Only the cable supplied with the camera should be used. Operation with other cables is likely to result in interference to radio and TV reception and could void the user¡¯s authorization to operate this equipment. This device complies with Part 15 of the FCC Rules.