
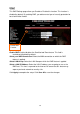
Installation guide

31
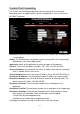
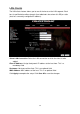
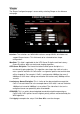
Custom Port Forwarding
The Custom Port Forwarding page allows you to create up to 15 custom port
forwarding entries to support specific services or applications, such as concurrent
NAT/NAPT operation.
Connection: Select the WAN connection on which the Custom Port Forwarding rule
is to be applied.
Enable: The Enable button is checked by default, meaning this rule is automatically
applied when you click the Apply button.
Application: Name of the application for which your ports will be opened.
Protocol: There are three options available: TCP, UDP, and TCP and UDP.
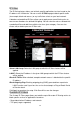
Source IP Address: You can define the source IP address from which the incoming
traffic is allowed. Enter 0.0.0.0 for all.
Source Netmask: Netmask of the source IP address. Enter 255.255.255.255 for all.
Destination IP Address: The LAN-side destination IP address for incoming traffic.
Destination Netmask: The LAN-side destination netmask for incoming traffic. The
default value of this field is 255.255.255.255.
Destination Port Start: The starting port number that is made open for this
application.
Destination Port End: The ending port number that is made open for this application.
Destination Port Map: Destination port mapped on the LAN (destination) side to
which packets are forwarded. There are two types of port mapping:
• One-to-one (one port mapped to one)
• Multiple-to-one (multiple ports mapped to one port)
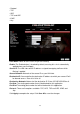
Click Apply to complete the setup. Click Save All to save the changes.