
Installation guide


18
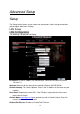
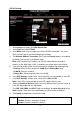
PPPoE Settings
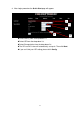
1. At the Setup main page, click New Connection.
2. At the Type field select PPPoE.
3. In the Name field, enter a unique name for the PPPoE connection. The name
must not have spaces and cannot begin with numbers.
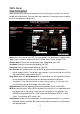
4. The Network Address Translation (NAT) and the Firewall options are enabled
by default. Leave these in the default mode.
Note—NAT enables the IP address on the LAN side to be translated to IP
address on the WAN side. If NAT is disabled, you cannot access the Internet.
5. If you want to enable VLAN, use the reference to configure the following fields:
• Sharing: Select VLAN to enable the VLAN ID and Priority Bits fields.
• VLAN ID: Enter the VLAN ID.
• Priority Bits: Select the priority bits of the VLAN.
6. In the PPP Settings section, enter values from DSL service provider or your ISP.
7. In the PVC Settings section, enter values for the VPI and VCI.
Note—Your DSL service provider or your ISP supplies these values.
8. Select the Quality of Service (QoS). Leave the default value if you are unsure or
if the ISP did not provide this information.
The PCR, SCR, MBS, and CDVT fields are enabled / disabled depending on the
QoS selection. Enter the values provided by the ISP or leave the defaults.
9. Click Apply to complete the connection setup.
Sharing The following options are available:
• Disable: Disables connection sharing.
• Enable: Enables connection sharing.