
Manual


- 15 -
Cleaning Instructions
Cleaning Instructions:
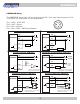
1. Begin by removing the sensor lid's 4 screws with a 1/16" L wrench.
2. G
ently lift the sensor's circuit board out by grasping the switch and pulling upward. Do not
r
emove the insulation tape.
3. C
lean the lens of the sensor's photo eye with a clean soft cloth moistened with 99%
i
sopropyl alcohol (available from most electronics supply & tool distributors - e.g. Techni-
T
ool, Contact East, Jensen Tools, Future Active, etc.)
4. L
ightly scrape off sticky label residue using an Xacto knife with a #17, #18, or #19 chisel
b
lade. The CS2000 has double hard anodizing that is not easily penetrated, but
n
onetheless, care should be taken when using the Xacto knife.
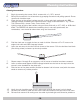
5. Fold the cloth over a couple of times to make it thicker. Saturate a 2" x 2" area on the
e
dge of the cloth with 99% isopropyl alcohol.
6. I
nsert the wet area of the cloth into the throat of the sensor. Pull the cloth back and forth
(
like shining shoes) to loosen up the sticky residue.
7. Repeat steps 4 through 6 as necessary until all traces of residue have been removed.
8. I
nsert a cotton swab dipped in 99% isopropyl alcohol into the hole on the top half of the
s
ensor's case intended for the photo eye.
9. R
ub the lens of the photo emitter (located on bottom half of sensor case) with the cotton
s
wab to remove any residue present.
10. Verify that the insulation tape is still in place and re-install the sensor's circuit board.
11. R
e-insert the sensor's cable into the strain relief slot located in the top/rear of the case.
12. R
e-install the sensor's lid making sure the cable is pinched tight and cannot be pulled out.