
Hardware manual


2. Configuration and Installation
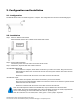
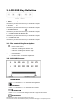
2.1. Configuration
The ND-WN Series rack LCD drawer supports 1 computer. The configuration is as shown in the following figure.
2.2. Installation
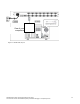
Step 1. Mount on Rack-mount Chassis
Mount the Rack Drawer LCD on Rack-mount chassis with screws.
Step 2. Power Cable Connection
Connect the power cord to the rack LCD monitor and AC outlet.
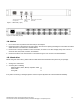
Step 3. PS/2 Mouse, Keyboard and VGA Cable Connection
ND-WN15M/17M/19M-KB:
Power down the computer, which will be connected to your rack LCD monitor. Plug one end of the
KVM expansion cable to the connectors at the rear of the PC system and the other end to the rack
LCD monitor.
Secure the connectors with the screws on the cable connector at both ends.
ND-WN17M 16 port:
Power down all computers, which will be connected to your rack LCD monitor.
Plug one end of the KVM expansion cable to the connectors at the rear of all the PC systems and the
other end to the rack LCD monitor.
Secure the connectors with the screws on the cable connector at both ends
Note: The KVM expansion cable for the ND-WN17M, 16 port is different from the other KVM
switch cables. The end of the KVM switch side is the 15-pin black connector for monitor, keyboard and
mouse. The matching port of the KVM switch also uses 15 –pin black ports.
Note: All connectors are color coded; blue – video, green – mouse, purple – keyboard.
Nd-WNxx-KB 1U Rack LCD Drawer Hardware User Guide
This document contains Confidential/Proprietary Information belonging to Computer Dynamics
2-1