Hardware Manual Nd-WNxx-KB 1U Rack LCD Drawer First Edition © 2012 Computer Dynamics Computer Dynamics is a division of Cimtec Automation. All rights reserved. No part of this publication may be reproduced, stored in a retrieval system, or transmitted in any form or by any means, electronic, mechanical, photocopying, recording, or otherwise without the prior written permission of Computer Dynamics. This document contains Confidential/Proprietary Information belonging to Computer Dynamics.
Copyright Notice This document is copyrighted, 2010 by the Manufacturer. The information provided in this document has been carefully checked and is accurate at the time of publication. However, Computer Dynamics, Inc. (CDI) assumes no responsibility for any infringements of patents or other rights of third parties that may result from its use.
Warnings, Cautions, and Notes as Used in this Publication Warning notices are used in this publication to emphasize that hazardous voltages, currents, temperatures, or other conditions that could cause personal injury exist in this equipment or may be associated with its use. In situations where inattention could cause either personal injury or damage to equipment, a Warning notice is used. Caution notices are used where equipment might be damaged if care is not taken.
Safety and Warranty • Please read these safety instructions carefully. • Please disconnect this equipment from any AC outlet before cleaning. • Do not use liquid or spray detergents for cleaning the screen or case, use a damp cloth to clean case. The display area is highly prone to scratching. Do not use ketene type material (ex. Acetone), Ethyl alcohol, toluene, ethyl acid or Methyl chloride to clear the panel. It might permanently damage the panel. Wipe the screen with a clean, soft, lint-free cloth.
Table of Contents Informational Pages..........................................................................................................................ii 1. Introduction...............................................................................................................................1-6 1.1. 1.2. 1.3. 1.4. 1.5. Overview.........................................................................................................................................................
1. Introduction 1.1. Overview The ND-WN Series (ND-WN15M-KB / ND-WN17M-KB / ND-WN19M-KB) is a series of compact devices, built-in a 15", 17” or 19" LCD display, standard keyboard with numerical keypad, and heavy-duty touch pad to eliminate hardware redundancy and to increase cost efficiency.
Figure 1-3: Rear Side (1 port) Figure 1-4: Rear Side (16 port) 1.4. Notice 1. Do not touch the LCD panel surface with sharp or hard objects. 2. Please ensure the LCD Drawer is securely in place. The surface for placing and fixing the LCD Drawer should be stable and level or mounted into a suitable cabinet. 3. Ensure there is enough ventilation for the LCD Drawer, as well as out of direct sunlight, away from sources of excessive dust, heat, water, moisture, and vibration. 4.
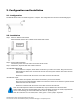
2. Configuration and Installation 2.1. Configuration The ND-WN Series rack LCD drawer supports 1 computer. The configuration is as shown in the following figure. 2.2. Installation Step 1. Mount on Rack-mount Chassis Mount the Rack Drawer LCD on Rack-mount chassis with screws. Step 2. Power Cable Connection Connect the power cord to the rack LCD monitor and AC outlet. Step 3.
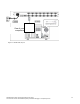
One of your computers Figure 2-1: Nd-M17-KB, 16-port Nd-WNxx-KB 1U Rack LCD Drawer Hardware User Guide This document contains Confidential/Proprietary Information belonging to Computer Dynamics 2-2
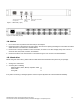
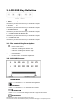
3. LCD OSD Key Definition 1. MENU / Use this key to select the function you would like to adjust. 2. ADJUST +/– Use this key to select the function you would like to adjust. 3. POWERSWITCH Use this key to select the function you would like to adjust. 4. POWER STAND-BY MODE LED Use this key to select the function you would like to adjust. 5. POWER ON LED Use this key to select the function you would like to adjust. 3.1.
Press "+" or "-" to move the image up or down on the screen. H-SCALING Press "+" or "-" to increase or decrease the Horizontal screen size. AUTO ADJUSTMENT Press "+" or "-" to have the monitor logic choose the best settings for the current input signal. WHITE BALANCE Press "+" or "-" to enable auto adjust white balance function. COLOR TEMPERATURE Press "+" or "-" to set the color temperature USER: Use this function to set a proper color temperature.
4. KVM (optional) The 1U Rack LCD Drawer build-in KVM Switch enables a single keyboard, video monitor and mouse to control multiple computers at a time. This product supports one console and up to 16 computer ports. Product model number as follow table: P/N LCD Size ND-WN17M-KB-16P Number of Ports 17" 16 This series KVM switch has an On-screen Display (OSD) menu so that you can operate the system easily. 4.1. KVM OSD Control 4.1.1. OSD Window Press the Left CTRL key twice to open this window.
Field of Command: To edit name, press F1 To active Scan, press F2 To set System, press F3 To exit OSD, press ESC To accept Command, press ENTER Highlight Bar: Use your up and down arrow keys to move the highlight bar, and press Enter to accept the change. 4.1.2. Characters Accepted by OSD Menu a-z, A-Z 0-9 - = / ,。; SPACE Note: the menu displays all letters in capital letter. Only the keyboard can be used in the OSD menu. 4.1.3.
4.1.8. Active Scan Function --- Open OSD window --- Press F3 --- Press ESC to exit Note: the KVM switch will skip the power-off computers or channels. If your system is in secure mode, this function will be deactivated. 4.1.9. Memory Function If you want to know the status of the connected computers or channels, just open the OSD window, and the position of highlighted bar will show you the current computer or channel. Note: this function is only available when using OSD to select computers or channels.
If your system is in secure mode, this function will be deactivated. Note: “Ctrl+Shift+A+Enter” means to press the left Ctrl key, then the Left Shift key, then A key, and then press Enter key.
5. Specifications Item ND-WN15M-KB ND-WN17M-KB ND-WN19M-KB Display Area (mm) 304.1 x 228.1 337.9 x 270.3 376.3 x 301.1 (15" diagonal) (17-inch diagonal) (19-inch diagonal) Pixel Pitch (HxV) 0.297 x 0.297 0.264 x 0.264 0.294 x 0. 294 1024 x 768 1280 x 1024 1280 x 1024 Number of Pixels 350:1 400:1 600:1 Contrast Ratio 16.2M colors 16.7M colors 16.
6. Troubleshooting Ensure that all cables are well seated. Check that keyboard/mouse cables are not swapped. If your monitor fails to operate correctly, consult the following chart for possible solution before calling for repairs: Delete Red Text Above & Fill-in table below. Condition 1. The picture does not appear 2. The screen is not synchronized Check Point • Check if the signal cable is firmly seated in the socket.
7. Appendix 7.1.
7.2. RMA Requests Refer to our website at www.cdynamics.com to obtain the latest instructions for requesting a RMA number.
About Computer Dynamics Computer Dynamics (A CIMTEC Automation Company) is a leading global provider of flat panel display solutions for a wide range of industries and applications. Our comprehensive product offering includes open-frame, enclosed, and environmentally sealed flat panel display systems in both computer and monitor configurations.