
User guide


2. Getting Started
2.1. Input / Output Devices
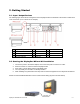
The following figure shows the I/O arrangement of the DisplayPac-WN. The backside of the chassis contains most
of the connectors (10.4" is shown as an example).
1 Brightness Adjustment Knob 5 Audio Jack 9 RS-232
2 Power On 6 USB 10 PS/2
3 Power Reset 7 RJ-45 11 DC IN Power Jack
4 RS-232 (optional) 8 VGA Out
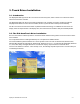
2.2. Starting the DisplayPac-WN and O/S Installation
1. Connect the power to the AC/DC adapter, and connect the power cord to the AC outlet.
2. Press the “Power On” switch to start the DisplayPac-WN.
3. Press “DEL” to enter CMOS and check the BIOS setup.
4. You may install your own O/S if not already installed.
5. When installing O/S, please follow the steps and use external equipment such as Keyboard and Mouse.
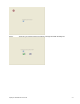
Please use external USB DVD-ROM to run the O/S and Driver setting (as picture showed below).
DisplayPac-WN Hardware User Guide
2-1