
User Manual Part 2
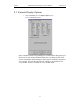
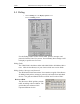
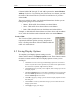

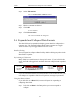
Table Of Contents
- 7. Recording Options
- 8. Display Options
- 9. Reading a CATC Trace
- 10. Decoding Higher Protocols
- 10.1 Introduction
- 10.2 LMP and L2CAP Messages
- 10.3 Decoding and Viewing Higher Protocol Data
- 10.4 Tooltips
- 10.5 Viewing Packets in LMP and L2CAP Messages
- 10.6 Types of LMP and L2CAP Messages
- 10.7 Viewing L2CAP Channel Connections
- 10.8 Viewing Protocol Messages and Transactions
- 10.9 Changing Protocol Assignments
- 11. Other Features
- 12. How to Contact CATC
- 13. Warranty and License

97
Merlin Protocol Analyzer User’s ManualCATC Version 1.6
Columns labeled "0" through "7" and "All" represent the Active Member
Address of a device. By checking one of the boxes in a column, you hide
the traffic of the selected device (or traffic from all devices if you have
selected All.)
The row in which you place your checkmark determines whether you are
hiding traffic going to or from a device.
• Master - Hide traffic from a Master to selected Slaves
• Slave - Hide traffic from selected Slaves to the Master
• Both - Hide all traffic between the Master and selected Slave
Example: to hide all traffic from a Master to a Slave device with an address
of six, click the checkbox under column 6 on the row marked Master.
Levels to Hide
The "Levels to Hide" grid divides into rows which
represent the different packet, message, and protocol
levels. Clicking a checkbox will cause Merlin to hide all
traffic of a selected level.
8.5 Saving Display Options
To complete your Display Options settings, use the
features at the bottom of the Display Options screen. These features remain
the same no matter which of the four Display Options screens you are
working in.
• Click Save to save the currently specified Display Options for use in future
sessions. Any file name can be specified, but you must use the .opt extension.
If no extension is specified, .opt is added by default.
• Click Load to load a previously saved *.opt file, thus restoring a previous set
of Display Options.
• The Save as Default function is equivalent to the Save function, specifying the
file name default.opt. Whenever you start up the analyzer, it automatically
loads the default.opt file if one exists.
• Click OK to apply any changes you have made to Display Options and close
this dialog box.
• Click Cancel to cancel any immediate changes you have made and exit the
Display Options menu.
• Click Apply to apply your changes.