
User Manual Part 2
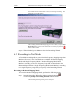
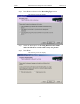
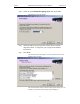
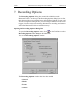
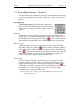
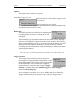
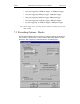
Table Of Contents
- 7. Recording Options
- 8. Display Options
- 9. Reading a CATC Trace
- 10. Decoding Higher Protocols
- 10.1 Introduction
- 10.2 LMP and L2CAP Messages
- 10.3 Decoding and Viewing Higher Protocol Data
- 10.4 Tooltips
- 10.5 Viewing Packets in LMP and L2CAP Messages
- 10.6 Types of LMP and L2CAP Messages
- 10.7 Viewing L2CAP Channel Connections
- 10.8 Viewing Protocol Messages and Transactions
- 10.9 Changing Protocol Assignments
- 11. Other Features
- 12. How to Contact CATC
- 13. Warranty and License

64
Merlin Protocol Analyzer User’s ManualCATC Version 1.6
Page Sync & Record
"Page Sync and Record" is the recommended method of recording. "Page
Sync and Record" should be implemented before a piconet is established.
This mode causes Merlin to perform a General Inquiry and collect sync
information from the specified slave device when it responds. Merlin then
waits for the Master to begin paging the Slave devices. When paging
begins, Merlin synchronizes to the Master and begins recording.
Note In order for this mode to work, the intended Slave must support "inquiry scan".
The following steps describe the simplest way to use this mode:
Step 1 Place both the "intended master" as well as its first "intended
slave" into inquiry scan mode.
Step 2 Have Merlin perform a General Inquiry. You do this by
selecting "General (Unlimited)" from the "Inquiry
Recording" drop-down menu on the "Modes" tab in the
"Recording Options" window, and then depressing the
"REC" button found on Merlin's toolbar.
Step 3 After the General Inquiry completes, as indicated by the
automatic uploading and displaying of a CATC trace
(approximately 20 seconds), reselect the "Modes" tab in the
"Recording Options". At this point, the addresses of all
Bluetooth™ devices that were in range will be listed in the
pull-down windows in the "Piconet Addresses" area of this
window. Using the pull-down windows select both your
"Intended BT Master" as well as your "Intended Slave"
address for display in their appropriate windows.
Step 4 After closing this window by pressing the "OK" button at the
bottom of the window, once again depress the "REC" button
found on Merlin's toolbar. After approximately 20 seconds,
the "SYNC" light on the front of Merlin will begin to flash,
meaning that Merlin has acquired all the information it needs
to fully synchronize with the piconet about to be established.
At this point, you should establish the piconet using the
devices previously defined as master and slave.
Step 5 When the piconet is established, the "Sync" light on the front
of Merlin will change from flashing to solid, indicating that
Merlin is fully synchronized to the piconet and is currently
recording all traffic within that piconet.