
User's Manual
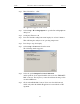
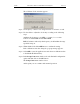


Table Of Contents
- 7. Display Options
- 8. Reading a CATC Trace
- 8.1 Trace View Features
- 8.2 Interpreting the Displayed Information
- 8.3 Tooltips
- 8.4 Set Marker
- 8.5 Edit or Clear Marker
- 8.6 Adding Comments to a Trace File
- 8.7 Expanded and Collapsed Data Formats
- 8.8 Hide Frequency Hops
- 8.9 Hide Nulls and Polls
- 8.10 Menus in Clicked Fields
- 8.11 Hide Unassociated Traffic
- 8.12 Hide Channel
- 8.13 Hide Duplicated Traffic
- 9. Searching Traces
- 10. Decoding Protocols
- 10.1 Introduction
- 10.2 LMP and L2CAP Messages
- 10.3 Decoding and Viewing Higher Protocol Data
- 10.4 Tooltips
- 10.5 Viewing Packets in LMP and L2CAP Messages
- 10.6 Types of LMP and L2CAP Messages
- 10.7 Viewing L2CAP Channel Connections
- 10.8 Viewing Protocol Messages and Transactions
- 10.9 Decoding via the Profiles Toolbar
- 10.10 Changing Protocol Assignments
- 10.11 Encryption
- 10.12 Re-applying Encryption Settings
- 11. Reports & Exporting Data
- Appendix A: Merlin II Clock Calibration
- How to Contact CATC
- Limited Hardware Warranty

155
Automation API for CATC Bluetooth AnalyzersCATC Ver. 1.30
The 'Calibrate Clock' window appears:
Step 10 Set frequency counter to use integration time of at least 1 second.
Step 11 Use the slider to adjust the clock only according to the following
steps:
A.Adjust the frequency to 26 MHz (+/- 1ppm), i.e. to a value
between 25.99998 MHz and 26.00002 MHz
B.Wait 5 minutes and verify that frequency is still within the range
specified in step A.
Step 12 When finished, Click the OK button to confirm the setting.
If the calibration value has changed, a pop-up message appears.
Step 13 Select OK to cause the application to write the new calibration value
to the Merlin II flash memory.
Step 14 In the Setup Connectors window select the 'Default Configuration'
option and then click on the OK' button.
The Setup Connectors window closes.
At this point you can continue with normal operation.