
User's Manual
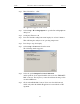
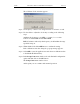


Table Of Contents
- 7. Display Options
- 8. Reading a CATC Trace
- 8.1 Trace View Features
- 8.2 Interpreting the Displayed Information
- 8.3 Tooltips
- 8.4 Set Marker
- 8.5 Edit or Clear Marker
- 8.6 Adding Comments to a Trace File
- 8.7 Expanded and Collapsed Data Formats
- 8.8 Hide Frequency Hops
- 8.9 Hide Nulls and Polls
- 8.10 Menus in Clicked Fields
- 8.11 Hide Unassociated Traffic
- 8.12 Hide Channel
- 8.13 Hide Duplicated Traffic
- 9. Searching Traces
- 10. Decoding Protocols
- 10.1 Introduction
- 10.2 LMP and L2CAP Messages
- 10.3 Decoding and Viewing Higher Protocol Data
- 10.4 Tooltips
- 10.5 Viewing Packets in LMP and L2CAP Messages
- 10.6 Types of LMP and L2CAP Messages
- 10.7 Viewing L2CAP Channel Connections
- 10.8 Viewing Protocol Messages and Transactions
- 10.9 Decoding via the Profiles Toolbar
- 10.10 Changing Protocol Assignments
- 10.11 Encryption
- 10.12 Re-applying Encryption Settings
- 11. Reports & Exporting Data
- Appendix A: Merlin II Clock Calibration
- How to Contact CATC
- Limited Hardware Warranty

154
Automation API for CATC Bluetooth AnalyzersCATC Ver. 1.30
Step 2 Enter MerlinII.exe -CLK
The application appears on the screen.
Step 3 Select Setup > Recording Options to open the Recording Options
dialog box.
Step 4 Set Inquiry Timeout to 0.
Step 5 Press the Start Recording button run inquiry for at least 5 minutes.
This will bring the analyzer to its operating temperature.
Step 6 Press Stop to stop the inquiry.
Step 7 Select Setup >Connectors from the menu.
The following window appears:
Step 8 Select the option Output Clock for Calibration.
At this point the clock signal should be directed to the 'TRIG OUT'
BNC connector. The frequency counter should start showing a value
around 26 MHz now.
Step 9 Click on the Clock Cal... button. Please note that this button is
visible only when the Merlin II application is run with the -CLK
argument.