
User's Manual
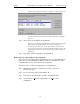
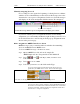
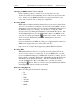
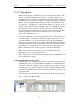
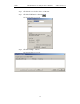
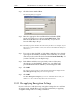
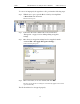
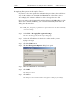
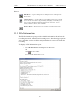
Table Of Contents
- 7. Display Options
- 8. Reading a CATC Trace
- 8.1 Trace View Features
- 8.2 Interpreting the Displayed Information
- 8.3 Tooltips
- 8.4 Set Marker
- 8.5 Edit or Clear Marker
- 8.6 Adding Comments to a Trace File
- 8.7 Expanded and Collapsed Data Formats
- 8.8 Hide Frequency Hops
- 8.9 Hide Nulls and Polls
- 8.10 Menus in Clicked Fields
- 8.11 Hide Unassociated Traffic
- 8.12 Hide Channel
- 8.13 Hide Duplicated Traffic
- 9. Searching Traces
- 10. Decoding Protocols
- 10.1 Introduction
- 10.2 LMP and L2CAP Messages
- 10.3 Decoding and Viewing Higher Protocol Data
- 10.4 Tooltips
- 10.5 Viewing Packets in LMP and L2CAP Messages
- 10.6 Types of LMP and L2CAP Messages
- 10.7 Viewing L2CAP Channel Connections
- 10.8 Viewing Protocol Messages and Transactions
- 10.9 Decoding via the Profiles Toolbar
- 10.10 Changing Protocol Assignments
- 10.11 Encryption
- 10.12 Re-applying Encryption Settings
- 11. Reports & Exporting Data
- Appendix A: Merlin II Clock Calibration
- How to Contact CATC
- Limited Hardware Warranty

138
Merlin II Protocol Analyzer User’s ManualCATC SW Version 2.30
Step 5 Click the button marked New.
The following dialog box appears.
Step 6 Enter the appropriate Personal Identification Number (PIN)
for the selected device to the box marked PIN Code. This
PIN allows Merlin II to learn the Link Key. If you do not
have the PIN, skip to Step 5.
Note The PIN you provide should be the same used by the Slave. For example, if your
Slave device requires a PIN of "1234", then enter the same PIN in the dialog box
shown above.
Step 7 If you do not have the PIN, or if the Master and Slave have already
agreed upon the Link Key, manually enter a Link Key as a 128 bit
(sixteen byte) hex value into the box marked Current Link Key. If
you have the PIN, you can skip this step.
Step 1 If the Master and Slave were previously connected, they may
already agree on the Link Key. In this case, you will need to
provide Merlin II with the Link Key and not simply the PIN.
Step 2 Click OK
The changes you have made are applied and the information is displayed in the
Slave Encryption Setup dialog box as shown previously.
Step 3 Click OK.
The Slave Encryption Setup dialog box closes. Within the Device List, you
should see a "Yes" in the Security field for the selected device.
10.12 Re-applying Encryption Settings
If you record a trace with the wrong encryption settings, the trace will not
decrypt properly. Merlin II lets you correct the problem by re-applying
encryption settings after a recording is finished.