
User's Manual

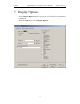
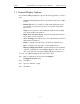
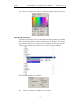

Table Of Contents
- 7. Display Options
- 8. Reading a CATC Trace
- 8.1 Trace View Features
- 8.2 Interpreting the Displayed Information
- 8.3 Tooltips
- 8.4 Set Marker
- 8.5 Edit or Clear Marker
- 8.6 Adding Comments to a Trace File
- 8.7 Expanded and Collapsed Data Formats
- 8.8 Hide Frequency Hops
- 8.9 Hide Nulls and Polls
- 8.10 Menus in Clicked Fields
- 8.11 Hide Unassociated Traffic
- 8.12 Hide Channel
- 8.13 Hide Duplicated Traffic
- 9. Searching Traces
- 10. Decoding Protocols
- 10.1 Introduction
- 10.2 LMP and L2CAP Messages
- 10.3 Decoding and Viewing Higher Protocol Data
- 10.4 Tooltips
- 10.5 Viewing Packets in LMP and L2CAP Messages
- 10.6 Types of LMP and L2CAP Messages
- 10.7 Viewing L2CAP Channel Connections
- 10.8 Viewing Protocol Messages and Transactions
- 10.9 Decoding via the Profiles Toolbar
- 10.10 Changing Protocol Assignments
- 10.11 Encryption
- 10.12 Re-applying Encryption Settings
- 11. Reports & Exporting Data
- Appendix A: Merlin II Clock Calibration
- How to Contact CATC
- Limited Hardware Warranty

96
Merlin II Protocol Analyzer User’s ManualCATC SW Version 2.30
7.1 General Display Options
Use the General Display Options to specify the basic appearance of a Trace
view.
• Zoom Level: Adjustable in discrete increments from 10% to 200%
percent.
• Enable Tips: Select to enable Tool Tips with explanation text to
pop up when you position your cursor over various fields in the
Trace View.
• Wrap: Causes packets to wrap within the window if their length
exceeds the width of the window.
• Right click cell context menu: Activates the right mouse button
for opening cell context menus.
• Trace Viewing Level: Allows you to select the hierarchical level at
which traffic is displayed.
• Fields: Configures the appearance of field text within the trace.
• Data: Configures the appearance of data within the trace.
• Display Configuration Name: Comment field associated with the
*.opt file containing the current Display Options values. You can
also create and store your unique Display Options for future use.
To create a new Display Options file, follow these steps:
Step 1 Enter a comment for the new file in the Display
Configuration Name field.
Step 2 Click Save...
Step 3 Specify a filename (*.opt).
Step 4 Click Save.