
User Manual
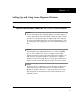

4-10 Setting Up and Using Laser Alignment Fixtures
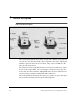
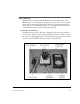
To set up the 8211, complete these steps:
1. ··· Plug the power cord into the power supply.
2. ··· Plug the power cord into an AC receptacle.
3. ··· Plug the power supply into the 8211 in the top end cap.
At that time, the beeper will sound indicating that power has been applied
to the battery charger. As a test, all LEDs will illuminate for 1.5 seconds.
4. ··· Plug the analyzer charging cable into the bottom end cap.
The sensor heads and analyzer can now be charged either individually or,
all at the same time.
Warning!
Do not plug the 8211 Power Supply directly into the
UltraSpec analyzer. If you do, the equipment may be
severely damaged.
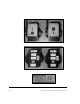
Charging the Sensor Heads with the Model 8211 Charger
Drop them over the posts so that the head faces outward as shown in
“Charging the Sensor Heads and Analyzer with Model 8211 Charger” on
page 4-9. Heads can be charged individually or together.
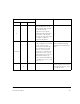
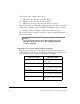
Indicator Light Charging Status
Pending Waiting for safe voltage and
temperature
Discharge (steady) Batteries discharging
Discharge (flashing Discharge requested, waiting
for safe voltage or temperature
Fast (steady) Batteries in fast charge
Fast (flashing) Fast charge requested, waiting
for safe voltage or temperature
Trickle Batteries in trickle charge,
topping-off, or charge complete