
User`s manual
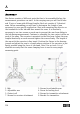


adjust the laser beam with the adjustment screws on the T110/T111
until the displayed values are 0.
Repeat the steps 2-6 until the laser beam is centered during rotation.
Measuring
Read more in the Advanced Straightness Measurement chapter.
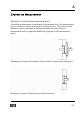
Move the fixture with the detector to the first bearing journal and
position it up-side-down . Align with the spirit level and clamp it with
the brace level. Zero the values on the displaybox.
Zero the measuring values on the displaybox.
Rotate the fixture 180° and clamp it. Read and halve the measurement
values. Press the register icon to register the measurement point.
Enter distance between measurement points on keypad.
Continue with the following bearing journals. Press OK when all
measurement points are registered. This will take you to the
summary screen.
Evaluation of result and alignment
Read more in the Advanced Straightness Measurement chapter.
12. View result presentation on summary screen. Go to detailed diagram
to select references.
13. In the detailed diagram you can select reference points by touching
them. Since you are not using any reference points in this
measurement -delete all references by touching three times at the
same point.
14. Note: set screen filter to 0 when aligning.
Position the receiver at the measurement point that should be
aligned. Delta fixture is placed in the bottom. Do not rotate. Press
alignment icon to go to measurement point alignment screen. Align
the selected measurement point to zero. Press OK to confirm
adjusted values.
258