
Instruction Manual

2
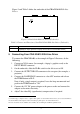
Avoid interference from neighboring electrical appliances and position your
machine away from moisture, excessive sunlight and dust
Caution – No operator-serviceable parts inside unit.
Warning – Use only the input power wall adapter that is
provided with this unit.
Warning – Disconnect power and unplug unit from wall
before installing or removing device or servicing unit.
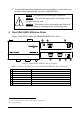
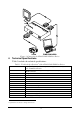
4 Your CDA-VGA10 XGA Line Driver
Figure 1 and Table 1 define the CDA-VGA10 XGA Line Driver:
Figure 1: CDA-VGA10 XGA Line Driver (Topside)
Table 1: Features and Functions of the CDA-VGA10 XGA Line Driver (Topside)
# Feature Function
1 12V DC +12V DC connector for powering the unit
2 OUTPUT HD15F Connector Connect to the VGA/XGA acceptor
3 EQ. Trimmer Adjusts
1
the cable compensation equalization level for the output
4 TERM Button
Pushing in selects 75; releasing selects Hi-Z
2
5 ON LED Illuminates when receiving power
6 LOOP HD15F Connector Connect to an additional monitor
7 INPUT HD15F Connector Connect to the VGA/XGA source
1 Insert a screwdriver into the hole and carefully rotate it, to trim the level
2 For looping select Hi-Z