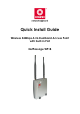
Quick Install Guide Wireless 54Mbps A+G Dualband Access Point with built-in PoE NetPassage WP18
Table of Contents 1: Introduction...................................................................................1 2: Let’s Get Going-Hardware Setup ...............................................3 3: Access to Web-based Interface ..............................................12 4: Panel Views and Descriptions...................................................17 5: Technical Specifications ...........................................................21 Packaging Content...........................
Chapter 1 Introduction 1: Introduction Compex WP18 Wireless 54Mbps A+G Dualband Access Point with built-in PoE let you have the best of both worlds with its versatile Dualband feature. Compex WP18 contains two separate wireless radio transceivers that support all three popular wireless network such as the IEEE 802.11b/g band which operates on 2.4GHz and the IEEE 802.11a band which operates at 5GHz.
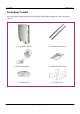
Chapter 1 Introduction Packaging Content Actual product appearance may slightly differ depending on the hardware version.
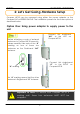
Chapter 2 Let’s Get Going - Hardware Setup 2: Let’s Get Going-Hardware Setup Compex WP18 can be powered using either the power adapter or the Compex PoE or IEEE802.3af PoE. The installation process for the three options is described below. Option One: Using power adapter to supply power to the unit Connect this dual-band “AG” to the LEFT on Compex WP18.
Chapter 2 Let’s Get Going - Hardware Setup Insert one end of the RJ45 Ethernet cable to any of the LAN ports (1,2 or 3) on your Compex WP18, and the other end of the cable to your PC’s Ethernet network adapter. PC Attach the power adapter to the main electrical supply, and connect the power plug into the socket of the Compex WP18.
Chapter 2 Let’s Get Going - Hardware Setup Power ON your PC. Notice that the Power and Port 1 or 2 (depending on which port you have connected the RJ45 Ethernet cable to) LEDs have lighted up. This indicates that the connection has been established successfully between your Compex WP18 and your PC.
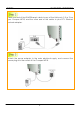
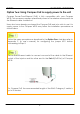
Chapter 2 Let’s Get Going - Hardware Setup Option Two: Using Compex PoE to supply power to the unit Compex Power-Over-Ethernet (PoE) is fully compatible with your Compex WP18. This accessory supplies operational power to the wireless access point via the Ethernet cable connection. Users who have already purchased the Compex PoE and who wish to use it to supply power to the Compex WP18 may follow the installation procedures as shown below: Follow the same procedure as described in the Option One.
Chapter 2 Let’s Get Going - Hardware Setup Next, connect the RJ45 Ethernet cable attached to the Compex PoE Injector to your PC’s Ethernet network adapter. Once you have finished configuring your WP18, you can connect the PoE Injector’s RJ45 Ethernet cable to your network device, such as to a switch or hub. PC Connect the power adapter supplied in the Compex PoE kit to the main electrical supply and the power plug into the socket of the injector.
Chapter 2 Let’s Get Going - Hardware Setup Now, turn on your power supply. Notice that the Power and Port 4 (PoE Port) (according to the picture illustration) LEDs have lighted up. This indicates that the WP18 is receiving power through the Compex PoE Injector and that connection between Compex WP18 and your PC has been established.
Chapter 2 Let’s Get Going - Hardware Setup Option Three: Using IEEE 802.3af PoE Injector to supply power to the unit Compex WP18 can be powered using the IEEE802.3af PoE Injector. This accessory supplies operational power to the wireless AP via the Ethernet cable connection. The installation process is described below. Follow the same procedure as described in the Option One. And also refer to Appendix C ( in user’s manual) for configuring the jumper JP01 before proceeding to Step 2.
Chapter 2 Let’s Get Going - Hardware Setup Next, connect the RJ45 Ethernet cable attached to the standard PoE Injector to your PC’s Ethernet network adapter. Once you have finished configuring your WP18, you can connect the PoE Injector’s RJ45 Ethernet cable to your network device, such as to a switch or hub.
Chapter 2 Let’s Get Going - Hardware Setup Connect the power adapter supplied in the IEEE802.3af PoE kit to the main electrical supply and the power plug into the socket of the injector. Note: The voltage and current supplied to the NetPassage WP18 power adapter and the standard PoE kit power adapter are different. Do not interchange the power adapters. PC Now, turn on your power supply. Notice that the Power and Port 4 (PoE Port) (according to the picture illustration) LEDs have lighted up.
Chapter 3 Access to Web-based Interface 3: Access to Web-based Interface There are two methods to access to the web-based interface of Compex NetPassage WP18: 1. Through the Compex Utility – uConfig You can access to the web-based interface directly without having to change the IP address of your PC. 2. Through your web browser First, you will need to assign an IP address to your PC, such as 192.168.168.xxx, where x can be any value from 2 to 254, so that it is in the same subnet as Compex WP18.
Chapter 3 Access to Web-based Interface Select NetPassage WP18 in the Compex Products List section and click on Open Web button. To update and display the available device(s) in the list, click on the Refresh button.
Chapter 3 Access to Web-based Interface This screen prompts you not to exit your uConfig program while accessing to your web-based interface, or else you will fail to connect to your device. Click on the OK button to proceed. At the authentication page, click on the LOGIN! button to enter the main configuration page. The default password is “password”.
Chapter 3 Access to Web-based Interface You will then reach the home page of Compex WP18’s web-based interface. Note: Refer to User’s Manual for instructions on how to configure Compex WP18 for wireless access. Access to the Web interface manually If you wish to access to the web interface manually, you need to configure the TCP/IP of your PC. Refer to Chapter 4 for detail.
Chapter 3 Access to Web-based Interface From the Product CD, click on Utilities and select NpFind program to run it. Once your Compex WP18 has connected to your PC, the program will automatically detect the device and display its IP address. Open your Internet browser, enter http://192.168.168.1 in the address bar and hit the Enter key from the keyboard. You will then reach the home page of Compex WP18’s web-based interface.
Chapter 4 Panel Views and Descriptions 4: Panel Views and Descriptions Front View of NetPassage WP18 in the standing position 8 1 2 3 4 5 6 7 Name 1 Power (LED) Description Steady Green The device is powered up. Off No power is supplied to the device.
Chapter 4 2 3 4 WAN (Link/Activity LED) WLAN (1),(2) (Link/Activity LED) 1,2,3 (Link/Activity/Speed LEDs) Panel Views and Descriptions Steady Green The WAN connection is enabled. Flashing Green Data transmission at WAN connection. Steady Green At least one wireless link is present. Flashing Green Activity is detected in the wireless network. These LEDs reflect the status of the integrated Fast Ethernet Switch. Steady Green There is a connectivity link of 100Mbps.
Chapter 4 Panel Views and Descriptions Side View of NetPassage WP18 in the standing position 8 9 10 11 12 13 14 Name Description 8 External Antennas 2dBi SMA antennas 9 R232 (Integrated Serial Interface) This interface is used for accessing the Hyper Terminal console to configure the NetPassage WP18. 10 WAN (RJ45 Port) 10/100Base-T Port connects to Cable/ADSL modem.
Chapter 4 Panel Views and Descriptions 11 1, 2, 3 (Ethernet Ports) Integrated 3-port 10/100Mbps Switching (RJ45) 12 4 POE (PoE Port ) If using power adapter: Connect to your PC or network hub or switch If using PoE: Connect to PoE injector 13 5V DC (DC Input) 5V DC power input 14 Reset (Push Button) To reboot, press once. To reset password, press and hold the button for 5 seconds. The DIAG LED will flash fast for about 5 flashes/sec before releasing the button.
Chapter 5 Technical Specification 5: Technical Specifications Safety and Electromagnetic Conformance • • • • • • • Standards FCC Part 15 SubPart B and SubPart C [for wireless module] EN 300 328-2 [for wireless module] EMC CE EN 301 489 (EN300 826) [for wireless module] EN 55022 (CISPR 22)/EN 55024 Class B EN 61000-3-2 EN61000-3-3 CE EN 60950 • IEEE 802.11a 54Mbps, 48Mbps, 36Mbps, 24Mbps, 18Mbps, 12Mbps, 9Mbps, 6Mbps, 1Mbps • IEEE 802.11b 11Mbps, 5.5Mbps, 2Mbps, 1Mbps • IEEE 802.
Chapter 5 Technical Specification Network Interface WAN Interface: 1 x 10/100 Mbps LAN Interface: 3 x 10/100 Mbps Power over Ethernet : 1 x PoE Security • • • • • 64 - bit / 128 – bit WEP WPA-EAP and WPA-PSK Wireless Pseudo Virtual LAN IEEE 802.1x – TLS, TTLS, PEAP, EAP-SIM Stateful Packet Inspection Firewall Output Power IEEE 802.11a: IEEE 802.11b: IEEE 802.
Chapter 5 Operating Temp: Storage Temp: Operating Humidity: Technical Specification 0ºC to 55ºC -20ºC to 75ºC 10% to 80% RH Humidity (RH – Relative Humidity): Further Information References For more details on the NetPassage WP18 configuration, please refer to the User’s Manual in the accompanying Product CD. This document may become superseded, in which case you may find its latest version at: http://www.compex.com.
Disclaimer: Compex, Inc. provides this guide without warranty of any kind, either expressed or implied, including but not limited to the implied warranties of merchantability and fitness for a particular purpose. Compex, Inc. may make improvements and/or changes to the product and/or specifications of the product described in this guide, without prior notice. Compex, Inc will not be liable for any technical inaccuracies or typographical errors found in this guide.
The transmitter shall not be collocated with other transmitters or antennas. ICES 003 Statement This Class B digital apparatus complies with Canadian ICES-003. DECLARATION OF CONFORMITY: Compex, Inc. declares that the product: Product Name: Compex Wireless 54Mbps A+G Access Point with built-in PoE Model No.: NetPassage WP18 conforms to the following Product Standards: This device complies with the Electromagnetic Compatibility Directive (89/336/EEC) issued by the Commission of the European Community.
WARRANTY REGISTRATION CARD [M-0088-V2.4C] Register via the Internet at http://www.cpx.com or http://www.compex.com.sg To activate the warranty, please complete this card and return to Compex within ninety (90) days from the date of purchase. Please e-mail this warranty card to support@compex.com.sg. Product: Purchase Date: Name: Model: Serial No: E-mail: Company: Address: Postal/Zip Code: Phone: ( Country: ) Note: For purchases within U.S.A and Canada, please fax to Compex, Inc.
Manual Number: M-0508-V1.1C Version 1.