
Install guide
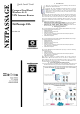

4. Hardware Installation
Before starting, please verify that the following is available:
• Cable/ADSL modem with RJ45 connection
• CAT5/5e networking cable
• At least one computer is installed with a Web browser and a wired
or wireless network interface adapter
• TCP/IP protocol is installed and IP address parameters are properly
configured on all your network’s nodes
• Before fixing the antennas, check the markings on the antennas.
See Section 4a on how to recognize ‘G’ and ‘AG’ antennas.
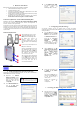
4a. How to recognise the ‘G’ and ‘AG’ antennas when fixing them
NetPassage 18A (namely, NetPassage 18A 1A11US, 1A13EU, 1B11US, 1B13EU)
has two types of antenna: dual-band ‘AG’ antenna and single-band ‘G’
antenna (as shown in the figure below).
It is important to fix the antennas correctly otherwise the router won’t function
properly. If you see no marking on the antenna, it indicates the single-band ‘G’
antenna being fixed to the right (Ant-2) of the NetPassage 18A. Otherwise the
‘A’ marking indicates the dual-band ‘AG’ antenna that is fixed to the left (Ant-
1) of the router.
4b. How to set up the router
Using an Ethernet cable, connect
your Cable/ADSL modem to the
WAN port of the NetPassage 18A.
For Wired user, connect an
Ethernet cable from your
computer’s network port to any of
the LAN ports of the NetPassage
18A.
Connect the power adapter to the
DC jack on the Router.
After the cable/ADSL modem and
the NetPassage 18A have been
turned on, the Router’s WAN link
LED should light up, to indicate that
the modem and Router are
connected to each other.
Turn on your PC. After it has booted
up, the LAN link LED corresponding
to the LAN port to which it is
connected, will light up so that you
can verify that your PC is
connected to the Router.
NOTE
For Wired Network users, please skip Section 5 and go to Section 6.
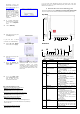
5. Configuring Wireless Network Connection
Depending on your client’s wireless adapter, you may set up Windows XP’s
Wireless Network Connection as follows:
1. Right-click on Wireless
Network Connection for the
wireless Ethernet adapter you
wish to connect with the
NetPassage 18A, and click
on Properties.
2. At the Wireless Networks tab,
click on the Add button
under Preferred Networks.
3.
At the Network name (SSID)
field, type in ‘compex’ ( the
factory default of
NetPassage 18A ). Click OK.
6. Configuring TCP/IP Settings
You should configure your PC or wireless client to obtain IP address
automatically. For users of Microsoft Windows XP, you may configure the TCP/IP
settings as follows:
1. Click the Start button. Select
Settings and click the Control
Panel icon. Then double-click
the Network Connection icon.
Right click on Local Area
Connection or Wireless
Network Connection
corresponding to the
Ethernet adapter you wish to
connect to NetPassage 18A.
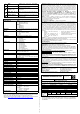
2.
Under General tab at This
connection uses the following
items, make sure the box
next to Internet Protocol
(TCP/IP) is checked. Then
select Internet Protocol
(TCP/IP), and click the
Properties button.
3. Check the radio button next
to Obtain an IP address
automatically .
Then click the OK button on
this page, and the OK button
on the previous page it
returns you to.
Restart your computer to
complete the PC
configuration.
7. Accessing the Web Configuration Interface
1. Insert the Product CD to your
CD-ROM drive, go to Utilities
section and run the uConfig
program, select Wireless-G
Multimedia Router and click
on OpenWeb button.