
Operating Instructions


5
Miscellaneous
You may think of other uses for the chronograph. For example, some have
used it to measure the speed of sporting clays. If you can get it to pass over
the sensors, you can probably measure it’s speed.
Battery Installation
Begin by installing a new 9 volt alkaline battery in the chronograph battery
compartment. There is also a space to store a spare. You can expect at
least 20 hours of operation from a fresh alkaline battery.
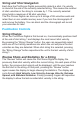
Mounting the Chronograph
The chronograph may be placed on a sturdy table or mounted to a
tripod using it’s molded-in ¼-20 threaded insert. Be careful to prepare
adequately for windy conditions, especially if you are using a tripod. The
diffusers make the chronograph susceptible to wind gusts.
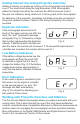
Installing the Guide Wires and Diffuser Hoods
(Note: Diffuser Hoods are intended for sunny conditions only)
Insert the 3/16” rods into the holes on each side of the plastic diffuser.
Insert one of the rods into the chronograph.
Insert the other rod into the opposite side of the chronograph.
Operating the Chronograph
To turn the chronograph on, move the small black slide switch on
the side of the chronograph to the “ON” position. The display will briey
show all segments.
Meters per Second/Feet per Second Selection
If you want to use the chronograph in ft/sec mode, just turn on the
chronograph normally. To start the chronograph in meters/sec mode, hold
down the “review” button while you turn on the chronograph. It’s readout will
be in meters/ sec when you do this. You must do this each time you turn on
the chrono to use it in metric mode.
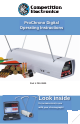
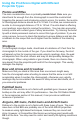
Competition Electronics, Inc.
ProChrono
Projectile
Sensors
Delete String
Button
Display Readout
Review Button
String Change
Button
Redisplay
Button
On/Off Switch
Comm Port
For Remote
Device Connection
Delete Shot
Butto
n
Battery Compartment
Tripod Mount
Insert 1/4-20 Thread