
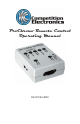
Operating Manual

USING THE PROCHRONO REMOTE
If you are in a place where you can actually fire a shot over the
ProChrono Digital chronograph, go ahead and do it. Otherwise,
fire a rubberband over the Chrono. (You must be outside, or have
an indoor lighting kit for this to work.) Whether you have selected
a PC, or the printer as your output device, the following message
will appear:
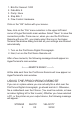
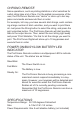
STRING# SHOT# VELOCITY
X XX XXXX
Bits Per Second: 1200
Data Bits: 8
Parity: None
Stop Bits: 1
Flow Control: Hardware
Click on the “OK” button with your mouse.
Now, click on the “File” menu selection in the upper left hand
corner of HyperTerminal’s main window. Select “Save” to save this
connection profile. From now on, when you use the ProChrono
Remote with your PC, you simply select the icon in the Hyper-
Terminal file window dialog box and all your settings are retained
automatically.
Turn on the ProChrono Digital Chronograph.
Next, turn on the ProChrono Remote unit.
After a few moments, the following message should appear on
HyperTerminal’s main window:
<——–REMOTE READY——–>
All the data sent from the ProChrono Remote will now appear on
HyperTerminal’s main window.
1.
2.
3.
4.
5.
1.
2.