
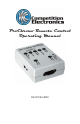
Operating Manual


BATTERY INSTALLATION
The recommended battery for proper operation of the ProChrono
Remote is a 9-volt ALKALINE battery. The battery compartment is
located on the bottom of the ProChrono Remote and its cover is
removed by pushing the grooved surface of the battery cover light-
ly inward and down to slide it off. Make sure the power switch on
the side of the ProChrono Remote is in the off position, because
the unit determines whether it will communicate with a PC or the
portable printer when turned on. Simply snap the battery connec-
tor onto the battery and place the battery in the compartment that
the battery connector is in. Replace the battery hatch cover.
GENERAL OPERATION
To use the ProChrono Remote with your ProChrono Digital Chro-
nograph, first make sure both units are turned off. Then, connect
the included 20 foot cable into the minijacks on the side of each
unit.
NOTE: The ProChrono Remote is not a stand alone unit; it is
designed to be connected to the ProChrono Digital Chronograph
at all times when in use, whether you are using it with the infrared
printer, a personal computer, or just as an extention of the control
buttons.
Connecting the ProChrono Remote with the In-
frared Thermal Printer
The ProChrono Remote contains an infrared LED which sends
print data to the optional thermal printer. Just make sure that the
printer’s red translucent receiving bezel is positioned near by and
in line with the ProChrono remote’s transmitting LED. This is the
LED on the side of the unit, by the power switch.
Place the printer within 18” of the unit and make sure that the
printer’s receiving bezel has an unobstructed “view” of the
ProChrono Remote’s transmitting LED. Also, make sure that the
horizontal angle between the transmitter LED and the receiving
bezel is not more than 60 degrees off axis and that the vertical
angle is not more than 20 degrees off axis.