
User`s guide


Appendix B - Installation
EK-TL891-UG .A01 B-5
NOTE
Step 9 should be performed by two people.
CAUTION!
Make certain that when the module is fully
extended that a force of 20% of the rack weight,
but not more than 57 lb. Applied in any direction
but upwards does not cause the rack to
overbalance.
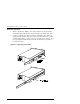
9. In front of the rack, lift the module to its installed height. Engage the
inner slides mounted on the module with the intermediate slides
protruding from the rack, and slide the module toward the rack until
the inner slide lock engages the intermediate slide. This leaves the
entire module protruding from the rack, locked in position, supported
by slides.
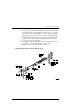
10. Press inward (toward the module) on each of the inner slide locks to
permit the intermediate slides to move toward the rack.
11. Slide the module in and out several times, ensuring that the inner and
outer slide locks engage, and that the module does not bind against the
slides.
12. If binding occurs, loosen the four screws that secure the slides to the
front rails and the four screws that secure the slides to the rear rails.
13. If necessary, repeat steps 11 and 12 until the module does not bind
against the slides.
14. If the rails on your rack are not threaded, install a clip nut on each front
rail at the height of the captive screws on the front panel of the Base
Module. If the rails on your rack are threaded, skip this step.
15. Slide the Base Module into the rack, and tighten the captive screws.
16. Once you have securely installed the MiniLibrary into the standard
rack, proceed to
Section B.2 - Interfaces and Cabling
.