
User`s guide


EK-TL891-UG .A01 B-1
B
Installation
There are three major steps to complete installation of the DLT MiniLibrary Base Module:
Mechanical Installation, Cabling and Configuration. This appendix deals with the first two.
Configuration, which consists of using the Configure Menu to customize the configuration
options to your particular application, is described in Chapter 4 - Configuration.
B.1 Mechanical Installation
The Base Module can be installed on a desktop or rackmounted in either a
standard 19” EIA/RETMA rack (with a depth of 24-30”) or a Storageworks
Metric rack using metric conversion brackets.
Desktop Installation -
No mechanical installation is required. Follow the
directions in the shipping container to unpack the module and place it in the
desired physical location (must be a stable, horizontal surface with at least a 2”
clearance behind it to allow a free flow of cooling air from the fan). Save the
packing materials for re-use in case you need to return the module for repairs.
Rackmount Installation -
Mechanical installation varies slightly
depending on
the type of rack used. Both rack types (standard and metric) require the initial
steps of separating the rack-slides and attaching the mounting-brackets The
procedures which follow first describe these common rackmount instructions,
followed by rack-specific rackmount instructions, and then common cabling and
configuration procedures in section B.2.
Follow the directions in the shipping container to unpack the module. Save the
packing materials for re-use in case you need to return the module for repairs.
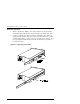
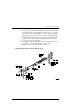
The base module comes with a slide rack set installed on either side. The slide is
attached to the Base Module enclosure by means of three screws through the
inner slide. Remove the packing tape from the slides, and separate each set of
slides as follows: