User’s Guide Compaq TFT5015 Color Monitor August 2001
© 2001 Compaq Computer Corporation Compaq, the Compaq logo, are trademarks of Compaq Information Technologies Group, L. P. All other product names mentioned herein may be trademarks of their respective companies. Compaq shall not be liable for technical or editorial errors or omissions contained herein. The information in this document is provided “as is” without warranty of any kind and is subject to change without notice.
Product Features The Compaq TFT5015 Flat Panel Monitor has an active matrix, thin-film transistor (TFT), liquid crystal display (LCD). The monitor features include: ■ 15-inch (38.
❏ Swedish MPR II 1990 (Touchscreen models) ❏ Swedish TCO ‘99 (except Touchscreen models) Information Files This monitor includes a CD-ROM with two information files to be installed onto your computer: an .INF file and an .ICM file. ■ The .INF file defines monitor resources and provides specifications used by Microsoft Windows 95, Windows 98, Windows 2000, and Windows Me to install support software for certain hardware devices. The .
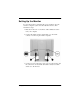
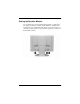
Setting Up the Monitor To set up the monitor, ensure that the power is turned off to the monitor, computer system, and other attached devices, then follow these steps: 1. Place the monitor in a convenient, well-ventilated location near your computer. 2. Connect the VGA monitor signal cable (1) to the VGA connector on the rear panel of the computer. 3. Connect one end of the AC power cord (2) to the monitor and the other end to an electrical outlet that is easily accessible and close to the monitor.
WARNING: To reduce the risk of electric shock or damage to your equipment: ■ ■ ■ ■ Do not disable the power cord grounding plug. The grounding plug is an important safety feature. Plug the power cord into a grounded (earthed) electrical outlet that is easily accessible at all times. Disconnect power from the monitor by unplugging the power cord from the electrical outlet. Do not place anything on power cords or cables. Arrange them so that one may not accidentally step on or trip over them.
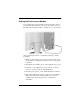
Setting Up Speaker Models If you purchased a monitor with internal speakers, complete the procedure described in “Setting Up the Monitor”. Models with speakers have two additional jacks on the rear of the monitor for connecting a microphone (2) and external speaker (3) as shown in the illustration below.
Setting Up Touchscreen Models If you purchased a monitor with the touchscreen feature, there is an external module attached to the rear of the monitor. Connect the USB cable from this module to a USB port on your computer. After connecting the cables, complete the following to install Touchware: 1. Make sure the touchscreen is properly connected. The setup program cannot configure the touchscreen if it is not properly connected. 2. Start Windows and make sure no other applications are open. 3.
Note: Touchscreen models will exhibit a slight reduction in brightness and contrast ratio: Without Touchscreen With Touchscreen Brightness 200 cd/m2 (typical) 150 cd/m2 (typical) Contrast Ratio 300:1 (typical) 175:1 (typical) Compaq TFT5015 User’s Guide 7
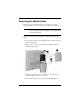
Removing the Monitor Base Before you can mount the monitor on a swing arm or other mounting fixture, you must remove the monitor from the base. CAUTION: Before beginning to disassemble the monitor, be sure the monitor is turned off and the power and signal cables are both disconnected. To remove the monitor from the base, complete the following steps: 1. Disconnect and remove the signal and power cables from the back of the monitor. 2.
CAUTION: Ensure that the bottom of the monitor base is positioned over a table or desktop before removing the base from the monitor. 5. Remove the monitor base from the monitor. When the base is removed, four threaded mounting holes are exposed on the monitor panel to be used for mounting purposes. These mounting holes are spaced 100 mm apart and are compliant with the Video Electronics Standards Association (VESA) standard for mounting flat panels. Mounting requires 4 each, M4 x .
Operating the Monitor Front Panel Controls No. Icon Control 1 2 Function Speaker (Speaker models only) - 3 Decrease volume Press to decrease volume; speaker models only. Mute Press to mute sound; speaker models only. 4 + Increase volume Press to increase volume; speaker models only. 5 - Adjustment/Auto Adjustment 1. Selects and adjusts functions. Menu 1. Launches 1st and 2nd level menus. 6 2. Activates Auto Adjust when the OSD is inactive. 2.
No. Icon Control Function 7 + Adjustment Selects and adjusts functions 8 Power Turns the monitor on and off 9 Power Indicator 1. Green indicates monitor is ON 2. Amber indicates Sleep mode. 3. Blinking amber indicates Sleep Timer*. *Sleep Timer enables you to set a time for the monitor to power on and power off at the same time every day. It eliminates the need to turnoff the monitor at the end of the day and conserves energy.
On-Screen Display (OSD) Settings The adjustments for screen settings are located in the on-screen display (OSD) and can be viewed in one of six available languages.
Management Power Saver On/Off Selection Power On Recall Mode Display Serial Number On/Off Selection On/Off Selection Display serial number Sleep Timer Basic Menu Cancel Timer Set Menu Save and Return OSD Control Horizontal OSD Position Adjustment Scale Vertical OSD Position OSD Timeout OSD Transparency Adjustment Scale Adjustment Scale Adjustment Scale Cancel Save and Return Factory Reset Yes No Exit How to Adjust Settings 1.
❏ Advanced Main Menu: Select “Advanced Menu” from the Basic Main Menu to display the Advanced Main Menu shown below. Main Menu Brightness Contrast Image Control Color Language Management OSD Control Factory Reset Exit Note: After the Advanced Main Menu has been selected, it remains the default on-screen display each time the monitor is powered on until the Basic Main Menu option is selected again. 2.
5. Access the third level by selecting a function and pressing the Menu button. Adjust the third level menu displays using the same procedures as the second level. 6. To exit from the on-screen menu, select Exit from the Advanced Main Menu. If the display is a second or third-level menu, select Save and Return or Cancel, then select Exit from the Advanced Main Menu. The on-screen display is easy to use, just follow the instructions on the screen.
■ Set On Time ■ Timer: On/Off ■ Sleep Now To set the Sleep Timer, complete the following: 1. Press the Menu button on the monitor front panel to display the Advanced Menu. 2. Scroll down and highlight Management. 3. Press the Menu button to select Management. 4. Scroll down and highlight and select Sleep Timer. 5. From the Sleep Timer menu, select “Set Current Time”. Note: You must set the current local time before you reset the time for Sleep Time or On Time. 6.
14. Set the Timer mode to On to activate the Sleep Timer settings. 15. When you are finished, select Save and Return to exit the Menu. The fifth selection Sleep Now turns the monitor backlights off immediately and stays in Sleep mode until the next On Time activates or a monitor button is pressed. Adjusting Screen Quality Allow the monitor to warmup for 20 minutes before performing the following procedure. If image quality improvement is desired, select “Auto Adjust” in the OSD, using the Minus (-) button.
■ Clock: Increase/decrease the value to minimize any vertical bars or stripes visible on the screen background. ■ Clock Phase: Increase/decrease the value to minimize video distortion or video jitter. Note: When adjusting the Clock and Clock Phase values, if the monitor images become distorted, continue adjusting the values until the distortion disappears. To restore the factory settings, select Yes from the Factory Reset menu in the on-screen display.
Display Resolutions The display resolutions listed below are the most commonly used modes and are set as factory defaults. This monitor automatically recognizes these preset modes and they will appear properly sized and centered on the screen. Display Resolutions Preset Modes Resolution 1. VGA 640 x 350 at 31.5 KHz/70 Hz 2. VGA 640 x 480 at 31.5 KHz/60 Hz 3. VESA 640 x 480 a 37.9 KHz/72.8 Hz 4. VESA 640 x 480 at 37.5 KHz/75 Hz 5. VGA 720 x 400 at 31.5 KHz/70.1 Hz 6. SVGA 800 x 600 at 35.
User Modes The video controller signal may occasionally call for a mode that is not preset if: ■ You are not using a Compaq standard graphics adapter. ■ Your are not using a preset mode. If this occurs, you may need to readjust the parameters of the monitor screen by using the on-screen display. User changes can be made to any or all of these modes and saved in memory. the monitor automatically stores the new setting, then recognizes the new mode just as it does a preset mode.
The following table describes the monitor energy saver levels available during the different modes of operation. Energy Saver Levels Mode Power Usage Description Full Power Less than 30 watts (40 watts w/speakers) ON = Normal operation Power LED is green Sleep Less than 3 watts Monitor screen is blanked. Backlights are turned off. Power LED turns amber. There is a brief warm-up period before returning to full power. Programmable Sleep Less than 3 watts Monitor screen is blanked.
Care and Maintenance This section explains how to care for and maintain your Compaq monitor during normal everyday use. Protecting the Monitor To protect your monitor from overheating and other types of damage, follow these suggestions: 22 ■ Use only a power source and connection appropriate for this monitor, as indicated on the marking label/back plate.
■ Keep the monitor in a well-ventilated area, away from excessive light, heat, and moisture. Keep the monitor away from high capacity transformers, electric motors, and other strong magnetic fields. ■ Do not open the monitor cabinet or attempt to service this product yourself. Adjust only those controls that are covered by the operating instructions. If the monitor is not operating properly or has been dropped or damaged, contact your Compaq authorized dealer, reseller, or service provider.
Agency Regulatory Notices Federal Communications Commission Notice This equipment has been tested and found to comply with the limits for a Class B digital device, pursuant to Part 15 of the FCC Rules. These limits are designed to provide reasonable protection against harmful interference in a residential installation.
Cables Connections to this device must be made with shielded cables with metallic RFI/EMI connector hoods to maintain compliance with FCC Rules and Regulations. Declaration of Conformity for Products Marked with FCC Logo, United States Only This device complies with Part 15 of the FCC Rules.
Avis Canadien Cet appareil numérique de la classe B respecte toutes les exigences du Règlement sur le matériel brouilleur du Canada. European Notice Products with the CE Marking comply with both the EMC Directive (89/336/EEC) and the Low Voltage Directive (73/23/EEC) issued by the Commission of the European Community.
EPA Energy Star Compliance Monitors that are marked with the Energy Star Logo meet the requirements of the EPA Energy Star program. As an Energy Star Partner, Compaq Computer Corporation has determined that this product meets the Energy Star guidelines for energy efficiency. Specific details on using the Energy Saving features can be found in the energy saver or power management section of the computer manual.
28 Compaq TFT5015 User’s Guide