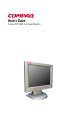
USER’S GUIDE COMPAQ TFT5000 FLAT PANEL MONITOR
Notice The information in this guide is subject to change without notice. COMPAQ COMPUTER CORPORATION SHALL NOT BE LIABLE FOR TECHNICAL OR EDITORIAL ERRORS OR OMISSIONS CONTAINED HEREIN; NOR FOR INCIDENTAL OR CONSEQUENTIAL DAMAGES RESULTING FROM THE FURNISHING, PERFORMANCE, OR USE OF THIS MATERIAL. This guide contains information protected by copyright. No part of this guide may be photocopied or reproduced in any form without prior written consent from Compaq Computer Corporation.
English Product Features The Compaq TFT5000 Flat Panel Monitor has an active matrix, thinfilm transistor (TFT), liquid crystal display (LCD). The monitor features include: 15-inch (38.
Compliance with the following regulated specifications: Swedish MPR II 1990 EPA ENERGY STAR European Union CE Directives Swedish TCO 1995 Universal Driver Manager This monitor may require a graphics driver (and/or .INF file) that is compatible with your computer’s graphics adapter. The CD-ROM included with this monitor contains an .INF file (see the section on Information Files).
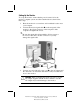
Setting Up the Monitor To set up the monitor, ensure that the power is turned off to the monitor, computer system, and other attached devices, then follow these steps: 1. 2. Place the monitor in a convenient, well-ventilated location near your computer. Connect the monitor signal cable 1 on the rear panel of the monitor to the 15-pin connector on the rear panel of the computer and tighten the screws. Be sure the signal cable aligns with the 15-pin connector.
! WARNING: To reduce the risk of electric shock or damage to your equipment: Do not disable the power cord grounding plug. The grounding plug is an important safety feature. Plug the power cord into a grounded (earthed) electrical outlet that is easily accessible at all times. Disconnect power from the monitor by unplugging the power cord from the electrical outlet.
Adjusting the Monitor Height To raise the monitor to the desired height: Place one hand on the side of the monitor panel, press the adjustment button located on the neck, and lift the monitor panel to the correct height. To lower the monitor to the desired height: Position your hand to support the bottom of the monitor panel, press the adjustment button located on the neck, and lower the monitor panel.
Rotating the Monitor Panel The monitor panel can be rotated 90 degrees as shown below. This is an added feature for use with software that displays portrait dimensions on-screen instead of landscape dimensions. The Pivot software package included on the Compaq CD-ROM should be installed on the computer to accommodate matching screen rotation. To rotate the monitor panel to portrait mode: 1. Raise the monitor panel to its highest height to avoid bumping the panel on the desk. 2.
After installing the Pivot rotation software on your computer, a monitor icon will appear on the right side of the Microsoft Windows Taskbar at the bottom of your screen. To rotate the screen contents: 1. Click on the monitor icon appearing in the Windows Taskbar. 2. Click on Rotate. To return the screen to its original dimensions, repeat this procedure. The monitor icon also activates the monitor Display Properties dialog box.
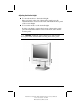
Operating the Monitor Front Panel Controls No./Icon 1 2 3 4 5 Control Function Menu button 1. Launches first and second-level on-screen menus. 2. Exits menus and on-screen display. Minus button Selects and adjusts the functions. Plus button Selects and adjusts the functions. Power switch Turns the monitor on and off. Power LED 1. Green indicates monitor is turned on. 2. Yellow indicates Suspend mode. 3. Amber indicates Sleep mode. 4. Blinking Amber indicates Sleep Timer*.
On-Screen Display Settings The adjustments for screen settings are located in the on-screen display (OSD) and can be viewed in one of six available languages.
Advanced Menu (Continued) Management Full Screen Power Saver Mode Display Serial No. Sleep Timer Basic Menu Yes No Yes No Yes No Displays Serial No. Set Time and On/Off Times Cancel Save and Return Factory Reset Cancel Reset Exit How to Adjust Settings To launch the on-screen display Main Menu: 1. 2. 3. Press the Menu button 1 on the monitor front panel. The Main Menu will display on the monitor screen.
4. 5. Adjust the second-level menu displays using the same procedures as the first level. To save the adjustments and exit from the second-level menu, select Save and Return, then select Exit. To launch the Advanced Main Menu: 1. Select the Advanced Main Menu from the Main Menu or press the Menu button twice and repeat procedures 2 and 3 for the previous paragraphs.
Special OSD Messages Special OSD messages will appear on the monitor screen when identifying the following monitor conditions: Input Signal Out of Range—Indicates the monitor is unable to access the appropriate input signal. Going to Sleep—Indicates the screen display is entering a sleep mode. Check Video Cable—Indicates the video cable may not be plugged into the computer or the computer may not be turned on.
5. Press the Menu button once to enter the adjustment mode for hours. 6. Press the Minus or Plus buttons to adjust the hour. 7. Press the Menu button again to enter the time for minutes. 8. Press the Minus or Plus buttons to adjust the minutes. 9. Press the Menu button to lock in the time chosen. 10. After setting the current time, the highlight automatically skips to Set Sleep Time “hours.” Repeat steps 6 through 9 to set Sleep Time.
Adjusting Screen Quality Allow the monitor to warm up for 20 minutes before performing the following procedures. The Auto Adjustment feature in the OSD automatically fine-tunes the image quality each time a new video mode is utilized. If additional improvement is desired, select "Auto Adjust" in the Main Menu. For more precise adjustments, use the Compaq LCD Display Assistant utility included on the CD-ROM.
Display Resolutions The display resolutions listed below are the most commonly used modes and are set as factory defaults. This monitor automatically recognizes these preset modes and they will appear properly sized and centered on the screen. Display Resolutions Preset Modes 1. Industry Standard Resolutions 640 × 350 at 31.5 kHz/70 Hz 2. Industry Standard 640 × 480 at 31.5 kHz/60 Hz 3. VESA 640 × 480 at 37.5 kHz/75 Hz 4. VESA 640 × 480 at 43.3 kHz/85 Hz 5. Industry Standard 720 × 400 at 31.
Energy Saver Feature The energy saver feature has four different modes of operation: Full power Suspend Sleep Programmable Sleep By selecting settings in the computer's Energy Saver utility, you are able to determine the length of the inactivity period before the monitor goes into sleep or programmable sleep mode. The following table describes the monitor energy saver levels available during the different modes of operation.
Care and Maintenance This section explains how to care for and maintain your Compaq monitor during normal everyday use. Protecting the Monitor To protect your monitor from overheating and other types of damage, follow these suggestions: Use only a power source and connection appropriate for this monitor, as indicated on the marking label/back plate.
Keep the monitor in a well-ventilated area, away from excessive light, heat, and moisture. Do not open the monitor cabinet or attempt to service this product yourself. Adjust only those controls that are covered by the operating instructions. If the monitor is not operating properly or has been dropped or damaged, contact your Compaq authorized dealer, reseller, or service provider. Cleaning the Monitor To clean the monitor, follow these steps: 1. 2. Turn off the monitor and the computer.
appendix Agency Regulatory Notices Federal Communications Commission Notice This equipment has been tested and found to comply with the limits for a Class B digital device, pursuant to Part 15 of the FCC Rules. These limits are designed to provide reasonable protection against harmful interference in a residential installation.
Declaration of Conformity for products marked with the FCC logo - United States only This device complies with Part 15 of the FCC Rules. Operation is subject to the following two conditions: (1) this device may not cause harmful interference, and (2) this device must accept any interference received, including interference that may cause undesired operation. For questions regarding your product, contact: Compaq Computer Corporation P.O.
EPA ENERGY STAR Compliance Monitors that are marked with the ENERGY STAR Logo meet the requirements of the EPA ENERGY STAR program. As an ENERGY STAR Partner, Compaq Computer Corporation has determined that this product meets the ENERGY STAR guidelines for energy efficiency. Specific details on using the Energy Saving features can be found in the energy saver or power management section of the computer manual.
Specifications Compaq TFT5000 Flat Panel Monitor Display 15-in 38.1 cm Type Flat panel, Active matrix-TFT LCD Viewable Image Size 15-in diagonal 38.1 cm Face Treatment 3H hardness coating with antiglare treatment Maximum Weight (Unpacked) 20 lb 9.06 kg Maximum Dimensions (Landscape Mode) Height 17.7 in 45.0 cm Depth 9.4 in 23.8 cm Width 15.4 in 39.1 cm Maximum Graphics Resolution 1024 × 768 at 75 Hz Refresh Rate Text Mode 720 × 400 Pixel Pitch 0.
Power Cord Set Requirements The monitor power supply is provided with Automatic Line Switching (ALS). This feature allows the monitor to operate on input voltages between 90-130V or 195-265V. The power cord set (flexible cord or wall plug) received with the monitor meets the requirements for use in the country where you purchased the equipment. Power cord sets must meet the requirements of the country where you use the monitor.
Country-Specific Requirements Power Cord Set Requirements: By Country Country Accredited Agency Australia Austria Belgium Canada China Denmark Finland France Germany Italy Japan The Netherlands Norway Singapore Sweden Switzerland United Kingdom United States EANSW OVE CEBC CSA CCEE DEMKO FIMKO UTE VDE IMQ MITI KEMA NEMKO PSB or PUB SEMKO SEV BSI UL Applicable Note Numbers 1 1 1 2 1 1 1 1 1 1 3 1 1 1 1 1 1 2 Notes: 1. The flexible cord must be Type HO5VV-F, 3conductor, 1.0 mm2 conductor size.