
User`s guide

Removal and Replacement 121
Removal and Replacement
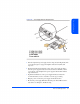
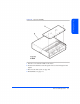
5 Slide the replacement power supply into the empty slot (D in Figure 60). The
power supply begins to engage the midplane with 3/8 inch (8mm) still
exposed.
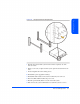
6 Rotate the handles back toward the center of the power supply module to
draw the power supply the last 3/8 inch into the chassis and firmly seat the
power supply on the midplane. The power supply should be flush with the
edge of the chassis.
7 Tighten the thumbscrews on the power supply handles (A and B). It is
recommended that you use a screwdriver to ensure proper seating.
8 Plug the power cord into the power supply and electrical source.
9 Monitor the power supply LED. It should turn green. If the LED is dark or
stays amber, see Chapter 4, Troubleshooting.