
Operating instructions

6
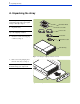
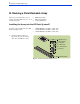
B. Racking a Field-Rackable Array
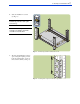
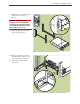
4. Install one clip nut on the inside of
each column (see Fig. 13).
Fig. 13. Installing rail clip nuts in HP Rack System/E
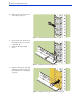
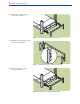
5. On the ends of the both rails, insert
the rail tab (see Fig. 14, A) into the
column hole (B).
6. Secure the rails with four M5
screws.
Fig. 14. Installing rails in HP Rack System/E
7. Install one clip nut each on the right
and left front columns (see Fig. 15).
(Use the black arrow on the template
as a guide.)
Fig. 15. Installing enclosure clip nuts in HP Rack System/E
B
A